13. Warm and Hot Standbys
For high-availability production systems, it is a serious problem if the repository has an unexpected error and has to be shut down, or possibly require restore from backup. While such problems are rare, critical systems must be prepared.
For such systems, a second GemStone system can be kept running in parallel, so it can be brought into use with minimal downtime. GemStone provides several options for standby systems.
13.1 Overview
Customers with critical, high-availability systems may want to keep a duplicate of a production GemStone server running almost in parallel as a standby system. This duplicate continually runs in restore mode, restoring transactions from the production server. If anything goes wrong with the primary production server, the standby can be brought into use very quickly.
The production system is referred to here as the primary or master system. The standby system is also referred to as the slave system.
Following a failover, these roles change; the standby system becomes the master and users log in to perform work. Often the system that was previously the master, after correcting the problem that caused failover, is updated to become the new standby.
To operate a standby, the primary system must be running in full logging mode, as described under Logging Mode.
This chapter discuss how to set up the standby server and the process for restoring logs, which differ between warm and hot standbys. For general information about restoring backups and transaction logs, see How to Restore from Backup. This discussion assumes you are familiar with that procedure.
13.2 Warm Standby
With a warm standby, transaction logs from the primary system are manually copied to the standby system as each log is completed. The standby runs in restore mode, and restores each log as it is closed.
When failover is needed. the final transaction log from the primary is copied over and restored, and the standby system performs a commitRestore and is then available for use as the new primary server.
An important point to remember is that the transaction logs copied from the production server, called the archive logs here, must be kept separate from transaction logs created by the duplicate server. You can do that by using different log directories or different file name prefixes.
Setup and run the warm standby
Step 1. Install the duplicate server. It is best to do a complete GemStone installation on a second node.
Step 2. Decide on a naming convention or location that you will use on the duplicate server to keep the archive logs separate from those being created by the duplicate server itself. For instance, if both Stones use the default prefix of tranlog, you might copy tranlog123.dbf on the production server to $GEMSTONE/data/prodtranlog123.dbf on the duplicate server.
Step 3. Make an extent copy backup, or a full backup of the primary system. You’ll have to do this at least once, when you start this system; however, regular backups will simplify matters when you need to synchronize the primary and the standby systems.
Step 4. Copy the extent backups, or restore the full backup, into the duplicate server. If you use extent copies, use the -R option to start the Stone, which causes the Stone to enter restore mode. For instance, startstone -R.
Step 5. As each transaction log completes on the primary system, copy the log to a file system accessible to the warm standby GemStone installation. Avoid moving these logs into the transaction log directory that the warm standby uses for its own transaction logs.
Wait several seconds after the new log is created before copying the old log, to ensure the completion of any asynchronous writes.
You can limit each transaction log to a tolerable amount of information either by limiting transaction log size or by starting a new log at regular time intervals:
- Size-based: Limit the transaction log size, as described under Choosing the Log Location and Size Limit. When a transaction log grows to the specified limit, GemStone starts a new transaction log.
- Time-based: On your primary system, run a script at regular intervals that terminates the current transaction log and starts a new one, using the method System class >> startNewLog.
Step 6. On the warm standby, restore the transaction logs as they are available.
Since the transaction logs for the primary are not in the STN_TRAN_LOG_DIRECTORIES of the standby, you will restore from an archive log directory for these tranlogs. You can restore from an archive log directory using one of the following methods:
Repository>>restoreFromArchiveLogs:
Repository>>restoreFromArchiveLogs:tranlogPrefix:
Repository>>restoreFromArchiveLogs:toEndOfLog:
Repository>>restoreFromArchiveLogs:toEndOfLog:tranlogPrefix:
The tranlogPrefix: argument allows you to use a different setting for STN_TRAN_LOG_PREFIX on the production and standby systems.
Since restoring transaction logs terminates the session, you will need to login for each restore. For example:
topaz> login
<details omitted>
successful login
topaz 1> printit
System restoreFromArchiveLogs: {'GS-archive'}.
%
Step 7. Repeat Step 5 and Step 6 as necessary.
You may find it necessary to shut down the standby from time to time. Ensure that you shut down the stone using stopstone. This does not affect the restore status.
Note that if the standby is not shut down cleanly (i.e. an unexpected shutdown), the restarted system has the status of its last checkpoint. You may need to restore tranlogs again that were previously restored.
Activate the warm standby in case of failure in the primary
Step 1. If the primary system fails, replay its latest transaction log on the standby system.
Step 2. On the standby server, send the message Repository>>commitRestore to terminate the restore process and enable logins.
Step 3. Client applications will have to reconnect to the standby system, which now becomes the primary system. Applications may have to perform their own failure recovery code as necessary, as well.
NOTE
Design your application and configuration so that, after a failure occurs and the standby is activated, client applications can reconnect to the new primary correctly.
Step 4. Correct the problem on the failed system and restart it.
Depending on how much time has elapsed since the standby system became the primary system, either make a full backup of the new primary system and restore it on the system that failed, or replay the new primary system’s transaction logs on the system that failed. Maintain that system in restore mode as the new standby.
13.3 Hot Standby
A Hot Standby provides faster failover since it can always remain synchronized with the primary server. If failover is needed, all that is required is to stop tranlog transmittal and restore, perform the final commitRestore, and the repository is ready for use.
As with the warm standby, a backup of the primary (or master) repository is installed on a standby (or slave) system. Then, special processes run to transmit the transaction log records as they are generated on the primary system. Individual transaction records, rather than entire transaction logs, are transmitted in compressed form between the systems. The standby system runs in a special mode where it will continuously restore the transaction log records. As a result, the standby system can keep closely synchronized with the primary.
Precautions regarding tranlog sequences
Since the hotstandby process relies on a logical sequence of tranlogs, some care must be taken to avoid situations such as described under Fork-in-Time Scenario.
For example, if you restore from backup on the primary, you must make a new backup of the primary, and restore this into the hot standby. Likewise, you cannot restore a backup into both the primary and the standby, since this creates a fork in the logical sequence of tranlogs, regardless of the tranlog numbering. While in some cases the automated process that transmit and restore the transaction log records will detect this, hotstandby systems should be managed with care to avoid any risk of issues.
Encrypted Extents and Transaction logs
On a hotstandby system, when the master has encrypted extents, the transaction logs are automatically encrypted. As long as the slave system uses the same key as the master, and the encryption keys do not change, there is no special handling required, other than the arguments provided to startstone to start the master and slave systems.
However, if the encryption key is changed on the master, the slave stone will not be able to restore any subsequent transaction logs without additional steps.
More information on using hot standbys with encrypted extents is included under Handling encrypted extents on the master Stone. Also, ensure you have carefully read Chapter 12 on handling encryption keys.
Multiple Slaves
You may have multiple slave systems attached to your master stone. All these slaves will be replaying the same tranlog records, and if failover is necessary, you can fail over to any of them. For more information on multiple slaves, see Upgrade via hot standby.
Hot standby processes
logsender
The logsender process runs on the master system. It determines when new transaction records are available on the primary system, and sends these records in compressed form to the standby slave system.
The logsender process is started using the startlogsender utility command. When starting the logsender, you must specify:
- The address and port to listen on for connections from a logreceiver on a slave system.
- The name of the master stone, or the list of all directories or raw partitions containing transaction logs generated by the master system, to provide the complete set of transaction logs containing data to be transmitted. It is strongly recommended to provide the Stone name.
There are other optional arguments. See startlogsender for more specific information on the arguments for this command.
A logsender continues to run when the associated master stone is shut down, and will check every few seconds for the master stone to be restarted, so it can reconnect. Since it is continuously listening for connection requests from a logreceiver, the connection with the logreceiver can also be automatically reestablished after a disconnect, provided the logreceiver is running.
The logsender can accept connections from up to 5 logreceivers. You may start a second logsender process for a Stone; however, only one logsender can use the -s stonename argument and connect to the Stone. Subsequent startlogsender commands must use the -T tranlogDir argument. The Stone is not aware of secondary logsenders, so secondary logsenders will not pick up any additional tranlog directories that are added.
You can determine all logsenders on a host, by executing gslist and looking for processes of type logsender. To determine the logreceiver or logreceivers connected to a logsender, use gslist -v -j logsendername. This reports details about the named logsender, and all logreceivers that are connected to it.
The logsender must be stopped explicitly using the stoplogsender utility command. See stoplogsender for more details.
logreceiver
The logreceiver process runs on the standby slave system. It receives transaction logs from the master system and writes them to a location where the slave stone can restore them.
The logreceiver process is started using the startlogreceiver utility command. When starting the logreceiver, you must specify:
- The address and port that the logsender on the master system is listening on.
- One or more directories to write incoming transaction logs from the master system. It is not recommended to use raw partitions.
- The name of the slave stone. While technically optional, without this the logreceiver cannot notify the slave stone that new data has arrived.
There are other optional arguments. See startlogreceiver for more specific information on the arguments for this command.
A logreceiver continues to run when the associated slave stone is shut down, and will check every few seconds for the slave stone to be restarted, so it can reconnect. If the connection to the logsender is lost, the logreceiver will attempt to reconnect.
The logreceiver must be stopped explicitly using the stoplogreceiver utility command. See stoplogreceiver for more details on this command.
Continuous Restore Mode
A slave system in a hot standby runs in continuous restore mode. In this mode, it can restore individual transaction records as they become available.
To enter continuous restore mode, execute:
SystemRepository continuousRestoreFromArchiveLogs: anArrayOfRestoreDirectories
To exit continuous restore mode, execute:
SystemRepository stopContinuousRestore
You must be in restore mode before you can enter continuous restore mode, and executing stopContinuousRestore leaves the stone still in restore mode.
You may not execute the commitRestore, which exits from restore mode, without first exiting continuous restore mode.
Transaction Record Transmittal
The process that transaction records follow from the master to the slave is described in this section.
Figure 13.1 High-level sequence of operations and processes in a hot standby
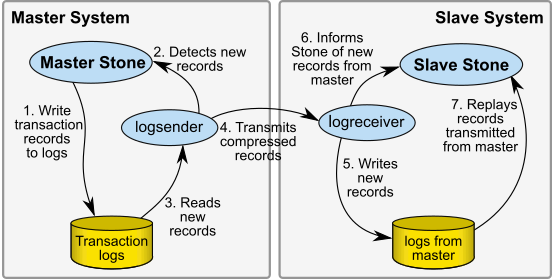
As transactions are committed on the master stone, transaction log records are written to the transaction logs. The logsender process is logged into the master stone and is aware when new transaction records are generated. The logsender also has an established connection with the logreceiver process. The logsender transmits the transaction log records in compressed form to the logreceiver.
The logreceiver accepts the transaction log records and writes them to the slave system’s directories for restore logs. The logreceiver is logged into the slave stone, and makes the slave stone aware that new transaction records are available for restore.
The slave stone is running in continuous restore mode, and restores the transaction records.
When a logsender or logreceiver is logged into a stone, or while a stone is in continuous restore mode, the stone cannot restore a full backup or restore tranlogs (using other restore methods), nor can it perform a commitRestore.
Multiple standby repositories
A given master stone may have multiple logsenders, and each of these logsenders may have multiple logreceivers connected. Each logreceiver represents a single slave system, all of which will be restoring the same transactions, although some may be behind others on a busy system, depending on the resources of the individual slave nodes.
When you fail over, you can choose any slave to fail over to, by executing the commitRestore on that slave system.
The method Repository>>failOverStatus, executed on the master, returns details about the restore status of the master and of the first slave to have connected. This method may be misleading in a multiple slave configuration.
The master stone itself is not itself aware of individual slave systems; the specific logreceivers being updated are known only by the logsender. The logsender connected to the master stone, provides information on the first logreceiver to have connected to it, and this is reported by failOverStatus.
Reporting all status for a logsender
For a complete status of all attached slave systems, use gslist -v -j logsenderName on the Stone’s host, for each logsender on the master. This will include identification information and last commit replayed details, for all of the currently connected slave systems (each represented by a logreceiver).
The slave that is reported by Repository failOverStatus, is identified by “"statusInMasterCache":"true".
The following is an example gslist output for a single logsender that has two logreceivers connected to it:
Example 13.1 gslist -v -j information for a logsender
unix > gslist -v -j logsender_57222
{"GemStoneServers":[
{
"Name":"logsender_57222",
"Host":"lark",
"HostId":"68621ab0486b1937",
"Ip":"10.94.471.15",
"Status":"OK",
"Type":"Logsender",
"Version":"3.7.0",
"Creator":"lalmarod",
"Started":"2023-08-11T18:13:29.000-08:00",
"Pid": 15613,
"Port": 57222,
"Options":{
"-d":null,
"-P":"57222",
"-A":"lark.gemtalksystems.com",
"-l":"/lark/admin/logs/logsender57222.log",
"-s":"gs64stone"
},
"LogName":"/lark/admin/logs/logsender57222.log",
"Sysconf":null,
"Execonf":null,
"GEMSTONE":"/lark/admin/GS6437",
"Exe":"/lark/admin/GS6437/sys/gem",
"Logreceivers":[ {
"StatusInMasterCache":"true",
"PeerIp":"10.94.471.127",
"PeerHost":"pelican.gemtalksystems.com",
"ProcessId": 3637081,
"ReplayedCommit":{"File": 4,"Record": 5235},
"ReplayedCheckpoint":{"File": 4,"Record": 5235}
},
{
"StatusInMasterCache":"false",
"PeerIp":"10.94.472.104",
"PeerHost":"robin.gemtalksystems.com",
"ProcessId": 791089,
"ReplayedCommit":{"File": 4,"Record": 5235},
"ReplayedCheckpoint":{"File": 4,"Record": 5235}
},
]
To setup and run the hot standby
Step 1. Install the slave server. It is best to do a complete GemStone installation on a second node.
Step 2. Decide on a directory location that you will use on the slave server to keep for the logs transmitted from the master.
Step 3. Restore a backup of the master system into the slave. There are several options:
- Make a programmatic full backup of the primary system. This must be a backup from the primary system; you cannot restore a programmatic backup into both the primary and standby, since commitRestore creates a fork-in-time (Fork-in-Time Scenario).
On the slave system, start the stone on a clean extent using startstone -R, and restore the full backup. Do not explicitly restore any transaction logs, nor commitRestore.
- Make an extent copy backup, either while the master stone is shutdown, or with checkpoints suspended. You can restore an extent copy backup into both the master and slave; the current transaction log from the time of the extent copy backup must be online and available. This includes an extent copy from a repository that was shutdown cleanly; the transaction log that was current at the time of a clean Stone shutdown may be needed, since no recovery can be done on the slave.
Copy the extent copy backup files to the slave system, and start the stone using startstone -N -R, so that the slave system is in restore mode.
You’ll have to do this at least once, when you start this system, and after each restore from backup or upgrade on the primary system.
Step 4. Start the logsender process on the master system using the startlogsender utility.
Before starting the logsender, you will need to determine the set of directories that contain transaction logs on the master system. This will include all the entries in the master stone’s STN_TRAN_LOG_DIRECTORIES. If the master stone’s transaction logs are copied to another directory as part of an archive process, these archive directories may also need to be specified.
You will also need to select an port number that is unused on the master system for the logsender to listen on.
startlogsender -P 57222 -A masterListeningAddress -s masterStone
Step 5. Start the logreceiver process on the slave system using the startlogreceiver utility.
You will use the same port as the logsender, and the directory or directories you determined in Step 2
startlogreceiver -P 57222 -A masterNode-T /gemstone/masterTransLogs -s slaveStone
Step 6. Put the slave stone into continuous restore mode. To do this, log into the slave system and execute Repository >> continuousRestoreFromArchiveLogs:, passing in the list of directories you determined in Step 2. After entering continuous restore mode, this method will exit and you can log out.
topaz 1> printit
SystemRepository continuousRestoreFromArchiveLogs:{/gemstone/masterTransLogs}
Note that if you stop and restart the slave stone, the repository remains in restore mode, but continuous restore will no longer be running. You must execute this method again after restarting the stone.
Activating hot standby when master system is not usable
There are a number of reasons for activating the hot standby slave stone, so it can take over the work of the former master stone. The most important (but least common reason), is when your master system has failed and is unusable, and the slave must assume the master role.
In case of a failure in the master system, such that the master system is not accessible, perform the following steps:
Step 1. If possible, confirm that all tranlog records have been transmitted to the slave system, and that the slave system has restored all transaction log records.
On the slave system, check the results of Repository >> restoreStatus on the slave system, and compare this to the results of copydbf -i on the final tranlog on the master system.
If the final tranlog is not available, and you wish to proceed with the possible loss of that data, verify that the final records that the logreceiver did receive have been restored by the stone.
Step 2. On the slave system, stop the logreceiver process, using the stoplogreceiver utility command, or by executing System killLogReceiver. These have the same effect; you only need to run one or the other.
os$ stoplogreceiver -P 57222
topaz 1> exec System killLogReceiver %
Step 3. On the slave system, login and execute
SystemRepository commitRestore
This will stop continuous restore, terminate the restore process, and enable logins. Prior to this, you may execute SystemRepository stopContinuousRestore, but it is not necessary; this is done by commitRestore.
The slave system is now ready for use as the new master.
Step 4. If you have changes in the configuration parameters for the slave system, you should reset these to the values that you want for the master, in the configuration file/s used by the former-slave system. Depending on the specific parameters, you may need to restart the former-slave system for these changes to take effect.
You will also need to enable any automated processes that you normally run on the master, such as monitoring, on the former-slave system.
Step 5. Client applications will have to reconnect to the former-slave system, which now becomes the primary system. Applications may also have to perform their own failure recovery code as necessary.
Once the issues on the former-master are addressed, in order to setup the former-master system as the new slave system, you will need to make a fresh backup of the new master, and restore this into the new slave (former master) system, following steps 3-6 under To setup and run the hot standby.
Controlled failover with immediate role reversal
Planned failovers, or failovers when the master system is operational and can be immediately put into use as a slave system, greatly simplify the effort of setting up the new slave system, by using failOverToSlave on the master.
The failOverToSlave failover is unlike a simple failover; both systems remain running, and there is no need to make and restore a fresh backup of the new master after the failover.
This is the full set of steps required to perform a failure with role reversal:
Step 1. Check the status of the slave system to confirm that the slave is up to date with respect to the master. While the failover will wait for tranlog records to be replayed on the slave, avoid failover when the slave is significantly behind the master.
SystemRepository failOverStatus
and verify that the master and slave are on or close to the same checkpoint.
If you have multiple slaves systems, the above method reports the slave information for only one of the slaves; any of the slaves may become the new master. For information about all slaves connected to a logreceiver, use:
os$ gslist -v -j masterLogSender
See Reporting all status for a logsender.
Step 2. On the master system, execute:
SystemRepository failOverToSlave
which will suspend commits, and perform a checkpoint, and enter restore from logs mode. A special failover record is written to the tranlogs. Commits are disallowed. Do not shut down the master stone; do not stop the logsender until all records have been transmitted to the slave.
Step 3. On the slave system that you wish to become the new master, execute:
SystemRepository commitRestoreForFailoverAfterWaitingUpTo: seconds
which will wait for the failover record from the master for the given number of seconds, then stop the logsender, exit continuous restore mode, then perform a SystemRepository commitRestore to terminate the restore process and enable logins.
The slave system is now ready for use as the new master.
Step 4. On the master system, stop the logsender process using the stoplogrsender utility command, or by executing System killLogSender.
os$ stoplogsender -P 57222
Step 5. If you have changes in the configuration parameters for the slave system, you should reset these to the values that you want for the master, in the configuration file or files used by the former-slave system. Depending on the specific parameters, you may need to restart the former-slave system for these changes to take effect.
You will also need to enable any automated processes that you normally run on the master, such as monitoring, on the former-slave system.
Step 6. Client applications will have to reconnect to the former-slave system, which now becomes the primary system.
Step 7. Start the logsender process on the former slave, new master system using the startlogsender utility.
startlogsender -P 57222 -A masterListeningAddress -s masterStone
Step 8. Start the logreceiver process on the former master, new slave system using the startlogreceiver utility. You will need to have transaction log directories available for the logreceiver to put the transaction logs transmitted from the master.
startlogreceiver -P 57222 -A masterNode -T tranlogDirectories -s slaveStone
Step 9. Put the former master, now slave stone into continuous restore mode. To do this, log in and execute Repository >> continuousRestoreFromArchiveLogs:, passing in the list of directories.
After entering continuous restore mode, this method will exit and you can log out.
The hot standby is now operational in the reverse direction.
Steps 8 and 9 will also need to be done on any secondary slaves that will now be slaves to the new master.
Upgrade via hot standby
You may perform a GemStone upgrade of a hot standby system, by upgrading the slave, failing over to make this the master, and allowing the former master, new slave to be upgraded via transaction logs.
This process has some dependencies on the specific originating and target versions. The documentation for this process is provided as a supplemental document at:
https://docs.gemtalksystems.com/current/upgradeViaHotStandby
Connecting using SSL Mode
Generally, both master and slave nodes of a hot standby would be within your secure network, and benefit from the ease and performance of regular socket connections.
However, you may also configure the logsender-logreceiver connection to use SSL, if the network between your master and slave system is not secure.
When you run the hotstandby in SSL mode, you will need SSL credentials for both the logsender and logreceiver in order for them to connect.
SSL standard TLS v1.2 is used.
The SSL-specific arguments are optional, and include:
For example, to setup a logsender/logreceiver with certificate verification fully enabled, using the example certificates provided with the GemStone/S 64 Bit distribution:
startlogsender -A santiam.gemtalksystems.com -P 57222 -s masterStone
-T $GEMSTONE/data
-S -J $GEMSTONE/examples/openssl/certs/cacert.pem
-C $GEMSTONE/examples/openssl/certs/server_1_servercert.pem
-K $GEMSTONE/examples/openssl/private/server_1_serverkey.pem
-Q ax3vd1PI6tkQEaW9EliXW2Lbzm9qgOA1bcsDudngRAkdpA8ffwcVnA==
startlogreceiver -A santiam.gemtalksystems.com -P 57222 -s slaveStone
-T $GEMSTONE/masterTranlogs
-S -J $GEMSTONE/examples/openssl/certs/cacert.pem
-C $GEMSTONE/examples/openssl/certs/client_1_clientcert.pem
-K $GEMSTONE/examples/openssl/private/client_1_clientkey.pem
-Q rFjqh4Q71Bh+6mAH8U1tFJFvZUzZkUIyLY+7A7mU0bT450c9voEvWA==
Self signed certificates
By default, self-signed certificates will be rejected, because the certificate cannot be verified by a known certificate authority. To use self-signed certificates, the signer must be added to the CA list in the CA file (-J flag), or certificate verification must be disabled with the -V flag. Using -V effectively tells OpenSSL to ignore certificate errors. In this mode, communications between the logsender and receiver are encrypted, but the identities of the logsender and/or logreceiver have not been verified.
Handling encrypted extents on the master Stone
GemStone supports encryption of the on-disk extents, and when the repository extents are encrypted, the transaction logs are automatically encrypted with the same key. The logsender/logreceiver can transmit the records from the master system to the slave system without decryption, but the slave Stone must be able to decrypt the transaction log records.
Master and Slave have the same encryption
Normally, the master and slave Stones would both use encrypted extents with the same encryption key. Both master and slave Stones are started with that key, and the slave can read the encrypted transaction logs produced by the master without further effort.
If you need to change the encryption key for the master system, this can be modified by using updatesecuredbf when the Stone is not running. When the master Stone is then started up with a new key, it will start a new tranlog that is encrypted with a new key. This will present problems for the slave system.
The recommended solution is to also update the encryption key for the slave Stone’s extents to match the key on the master Stone’s extents. This can be either by shutting down the slave Stone and restoring an extent copy backup into the slave, or by shutting down the slave Stone and executing updatesecuredbf on the slave’s Stone’s extents.
Slave encryption independent of Master
It is not required that the slave Stone use the same encryption keys as the master, or even that the Slave extents be encrypted at all. However, the slave Stone must be able to read the encrypted tranlogs provided by an encrypted master Stone.
You can pass the encryption keys that the master is using to the slave, using SystemRepository setTranlogPrivateKeysForRestore:, and providing an instance of GsTlsPrivateKey for the master extent encryption key. Note that since information is not retained while in restore mode, you will need to execute this again if you shutdown and restart the slave system.
topaz 1> printit
SystemRepository setTranlogPrivateKeysForRestore: {
GsTlsPrivateKey newFromPemFile:
'$GEMSTONE/examples/openssl/private/server_2_serverkey.pem'
withPassphraseFile:
'$GEMSTONE/examples/openssl/private/server_2_server_passwd.txt'}.
%
Added transaction logs to the master
If you anticipate the need to add transaction log directories or raw partitions to the master stone, use the -s stoneName argument rather than -T tranlogDir with startlogsender. The logsender will automatically pick up configured tranlogs for the Stone when -s is used. This includes transaction logs added dynamically using Repository >> addTransactionLog:size:.
13.4 Tuning a Warm or Hot Standby
The key consideration in tuning your standby system is keeping the standby as up-to-date as possible, so it will be ready if needed. This differs from the tuning priorities on your production system, which must balance user commit activity against background maintenance operations.
As your standby replays transactions, it duplicates the work that was performed on the primary system. Large operations that take considerable time on the production system will also require time on the standby.
Tuning Reclaim
When transactions from the production system are replayed, and create a large amount of reclaim work to be done, the time that this reclaim takes can be a significant bottleneck.
The parameters that are used to tune reclaim in your primary system may be set to values that ensure that reclaim does not delay user commits, which does not provide optional reclaim performance for the standby.
To tune reclaim on your standby, set the ReclaimGem configuration parameters to standby-specific values using the runtime interface.
For example, if you have set the parameter #sleepTimeBetweenReclaimUs to a nonzero value in your production system, to ensure that ReclaimGem activity does not block user sessions, you can reset this to zero in the standby system:
System setReclaimConfig: #sleepTimeBetweenReclaimUs toValue: 0
This will need to be executed again if you stop and restart your standby system, since it is not a persistent change; recall that you cannot commit persistent changes to a repository in restore mode.
For a full set of Reclaim Gem configuration parameters, see Tuning Reclaim.