9. Making and Restoring Backups
This chapter describes how to make backups of your GemStone/S 64 Bit repository and how to use the backups and transaction logs to restore the repository.
9.1 Overview
To safeguard your repository, you should create a backup of your GemStone repository periodically, and store the backup in a safe place. Backups provide security in case of problem with power, operating system, disks, or other system corruption, and if used in combination with transaction logs, preserve all committed data against loss.
Making a backup of the GemStone repository captures the state of the system at a particular moment in time, and restoring that backup can return your system to the state it was in at the time the backup started. A GemStone backup is a backup of not only your application data, but also your application code and GemStone kernel code, and of user profiles and passwords and so on - everything in the repository. Because the backup includes kernel code, backups can only be restored into the same version of GemStone as that in which the backup was created; otherwise the kernel classes and methods may not be appropriate for that version.
Between these periodic backups, transaction logs capture all committed changes that occur in the repository (provided the repository is in full logging mode). By preserving the backup and a set of transaction logs, you have the ability to recreate the system up to the last committed change in the transaction logs.
In partial tranlog mode, the transaction logs cannot be applied after restoring a backup. In this case, the transaction logs are useful when recovering from transient problems such as unexpected shutdown, but restoring a backup can only restore the system to the state it was in at the time of the backup. Later transaction logs in partial logging mode cannot be applied to recover work done after the time of the backup.
You should establish a regular backup process and schedule that fits your application requirements, and a system of managing and archiving the backup files and transaction logs that will allow you to recover smoothly after any problems.
In addition to regular backups, to ensure protection from disk failure, we recommend that you either use mirrored disks or operating system mirroring. For more information, see Developing a Failover Strategy.
Warm and Hot Standbys
GemStone’s backup and restore mechanisms can be used to set up a secondary server, running in parallel with the primary server and ready to take over as quickly as possible in case of any failure of the primary system.
To do this, a backup of the primary server is restored into a separate location. This backup stays running in restore mode, and as transactions are generated on the primary server, they are restored into the standby system. In case of failure of the primary system, the standby can be quickly ready to use and in a state identical to the failed system.
For details on how to set up a warm or hot standby system, see Chapter 10, “Warm and Hot Standbys”.
Version Compatibility
It is not always possible to restore backups made by a previous version of GemStone into a new version. Since kernel classes and methods are also included in the full backup, restoring an older version will result in GemStone Smalltalk code that is not correct for the GemStone version.
If you archive backups of your GemStone repository over multiple upgrades of your GemStone installation, you should also archive the GemStone executables for each version.
While not supported, in cases where it is possible to restore the backup from an older version into a more recent version, you should follow the upgrade instructions in the Installation Guide to run upgradeImage, to ensure kernel code is updated.
9.2 Types of Backups
GemStone supports three types of backup:
Extent snapshot backups consist of operating system copies of the extent files.
When the repository is offline, and was cleanly shut down, the extent files can be copied using regular OS copy functions with no further considerations.
To make extent file copies of a repository that is in use (online), checkpoints must be suspended for the duration of the extent copy. The extents are updated during checkpoints, so if a checkpoint occurs during extent file copy, it is likely the backup files will be corrupted and unusable.
Smalltalk full backups are made by executing backup methods in GemStone code. These can only be created when the system is running. Executing the backup methods will cause all live objects in the repository as of the time the backup method execution began to be written out to one or more operating system files. Dead objects, and internal structures such as the object table, are not written out, so these files typically are somewhat smaller than the repository extent size (excluding free space in extents).
Determining which type of backup to make depends on the size of your repository and the uptime requirements.
- Offline extent backups are the most simple, since nothing is needed beyond clean shutdown and file copy. However, since these must be taken when the repository is shut down, they are not suitable for systems that must be available 24x7.
- Full backups are convenient to run in highly-available systems that are not shut down regularly. However, backup execution places load on the system, and should be avoided during periods of heavy system use. Restore from full backup will also take much longer than offline or online extent backups
Backups made using full Backups methods have other value: restoring these backup files can be used to change the number of extents, redistribute objects among extents, or reduce the size of extent files.
- Online extent snapshots require the most effort to setup, since checkpoints must be suspended for the entire duration of the file copy. Since file copy is limited only by throughput of the physical disks, for large repositories that are in use 24x7, online extent backups will have the smallest impact on availability and on performance. They will also be much faster to restore than full backups.
Full vs. Partial Transaction logging
As described under Logging Modes, your repository may be run in partial transaction logging mode, or in full transaction logging mode.
In partial transaction logging mode, you cannot make online extent backups, since checkpoints cannot be suspended while you are this mode.
While you can make Smalltalk full backups, or offline extent copy backups, you cannot restore transaction logs into these backups. If you need to restore from backup, any work done after the start of the backup is permanently lost. For repositories with valuable data, we recommend that you run in full logging mode to avoid data loss in case of extent corruption.
Verify Backup Process
Creating a backup and archiving transaction logs is only useful if you can restore them successfully in case of a system failure. To make sure that your procedures for archiving and restoring backups is complete and correct, it is good practice to perform the restore operation into a non-production system, replay tranlogs, and audit the restored repository. Instructions for auditing can be found Audit information are under Repository Page and Object Audit.
Performing this exercise ensures that if you do have an emergency situation, you will have the required files available and be familiar with the process of restore, and avoid the risk of losing data.
9.3 How To Make an Extent Snapshot Backup
Extent snapshot backups are file system copies of the repository extents. These copies can be made when the repository is not running (offline); or when the repository is running (online), provided you suspend checkpoints for the duration of the extent file copy.
WARNING
File system copies of the extents of a running GemStone repository that are taken during a period that includes a checkpoint will have inconsistent state, and not be usable for restore.
Extent Snapshot Backup when the Repository is shutdown
When the repository is shut down, you can safely perform a file system backup of the extents files. During the shutdown process, a checkpoint is performed in which all committed transactions are written to the extents. A copy of the extents after an orderly shutdown constitutes a complete operating system backup of the repository without requiring any transaction logs.
If GemStone was not shut down cleanly, file system copies of the extents are usable, but they will not include any transactions committed since the last completed checkpoint before the shutdown. In order to recover later work, you will also need one or more transaction logs.
This applies for both partial logging and full logging.
copydbf -i will report if the extents were cleanly shutdown and the oldest tranlog required for recovery if the extents were not cleanly shutdown.
Extent Snapshot Backup when the Repository is running
When the repository is running, you must suspend checkpoints before starting the extent file copy, and resume checkpoints when the file copy is complete.
You should not attempt to take online extent snapshot backups when the repository is in partial logging mode (STN_TRAN_FULL_LOGGING = FALSE), since checkpoints cannot be suspended in partial logging mode.
Three steps are involved in an online extent backup
Checkpoints are not permitted while the extent file are being copied for the online backup. There must not be a checkpoint in progress when the first extent file copy starts, and no checkpoints are allowed to begin until the last extent file copy has completed. All other database operations (including commits, aborts, and the creation of new tranlogs) are permitted during the online extent snapshot backup.
To suspend checkpoints for a specified number of minutes, call System class >> suspendCheckpointsForMinutes:. If this method is called while a checkpoint is already in progress, it will block until the current checkpoint completes. On some systems under heavy load, checkpoints may take some time to complete; the period in which checkpoints are suspended does not begin until the previous checkpoint is complete.
If one session attempts to suspend checkpoints and is blocked while the current checkpoint completes, and then a second session attempts to suspend checkpoints, the second session fails and the method returns false.
If the system is shut down while checkpoints are suspended, checkpoints will be re-enabled and a final checkpoint will be written during the clean shutdown process. Any extent snapshot backups in progress during system shutdown must be discarded.
To query the current status of checkpoints, call System class >> checkpointStatus. This method returns an Array object containing a Boolean that indicates whether checkpoints are suspended, and an Integer giving the number of seconds remaining in the suspension.
Example 9.1 Suspending Checkpoints

topaz 1> printit
System checkpointStatus
%
an Array
#1 false
#2 0
topaz 1> printit
System suspendCheckpointsForMinutes: 15
%
true
topaz 1> printit
System checkpointStatus
%
an Array
#1 true
#2 900
We recommend using a value of minutes that is much larger than any possible anticipated time, taking into consideration the amount of time backups may take after future repository growth. If checkpoints resume before the extent/s copy is complete, the snapshot will not be usable.
It is preferable to have checkpoints suspended for as short a time as possible, but it is safer for the backup script to manually resume checkpoints after the file copies are completed, rather than relying on tuning the time out period.
2. Copy the repository extents.
Once checkpoints are suspended, the session requesting the suspension can log out from GemStone and start the extent copy, using operating system commands or copydbf.
Once the extent copy has completed, a session should log in to GemStone and request the Stone to resume checkpoints (System class >> resumeCheckpoints). The result of this method is false if checkpoints were not previously suspended before executing System class >> suspendCheckpointsForMinutes: (as in Step 1), and true if they were previously suspended.
topaz 1> printit
System resumeCheckpoints
%
true
From this result, you can determine if the online extent backup was completed while checkpoints were still suspended. If the backup was completed in time, no further action is required and the backup is complete. If the backup did not complete before checkpoints were resumed, then the backup must be discarded and another online extent backup must be taken.
CAUTION
Make sure your backup code checks this result, since a false return value means that your backup is not usable.
An Example Script
The GemStone installation directory includes an example script $GEMSTONE/examples/admin/onlinebackup.sh. You can customize this script for your own system.
This script does not include code to make file system copies of the extents; you must add the necessary code to perform this task. This script provides a default checkpoint suspension of 15 minutes, which may or may not be sufficient time.
NOTE
The example script onlinebackup.sh is unsupported. It is provided here for your convenience, and is subject to change in future releases.
Be sure to review and test your script adequately to ensure the integrity of your backups.
9.4 How To Make a Smalltalk Full Backup
You can create a backup of the objects in your repository by performing Smalltalk full backups, using methods provided as part of the GemStone kernel. Smalltalk full backups are required if you want to reduce the number of extents in the repository or redistribute objects within the repository. During a Smalltalk full backup, dynamic internal data structures are not copied and will be rebuilt, which can, at least temporarily, improve the performance of such routine maintenance tasks as garbage collection.
In a Smalltalk full backup, the methods Repository>>fullBackupTo: or fullBackupTo:MBytes: save the most recently committed version of the repository in a way that is consistent from a transaction viewpoint. These methods force a checkpoint of the repository at the time the method is executed and then creates a backup from that checkpoint, copying all objects in the repository and arranging them in a compact form in one or more files.
You can make Smalltalk full backups while the repository is in use. Other sessions can continue to commit transactions, but those transactions are not included in the backup. Full backups require the GcLock, and so full backups cannot be made while other operations that hold the GcLock are running.
A Smalltalk full backup includes these three steps:
1. The Gem performing the backup scans the object table, building a list of objects to back up. This step runs in a transaction and can therefore cause a temporary commit record backlog in systems with high transaction rates. This step normally completes fairly quickly.
2. The Gem performing the backup next writes all shadow objects to the backup file. This step also runs in a transaction; furthermore, backing up shadow objects requires more disk I/O than backing up live objects, so the rate of objects backed up per second is slower in this step than in the next.
(For definitions of shadow and live objects, see Basic Concepts.)
3. In the final step, all remaining live objects are written to the backup file. This step is performed outside a transaction; if the Stone signals the session to abort, it will do so. This step takes the longest of the three.
The fullBackupTo: Methods
Repository>>fullBackupTo:filename
Repository>>fullBackupTo: arrayOfFilenames MBytes:mByteLimit
In these methods, filename or arrayOfFilenames specifies one or more files where the backup is to be created. You must specify the name of the files, not a directory name. You may include a relative or absolute path in addition to the file name.
If you use a relative path, the path is relative to the directory of the Gem process or linked session. For linked topaz sessions, this is the directory from which topaz was started. For RPC Gems, this is either specified by #dir: in the login parameters, or the home directory of the Gem’s UNIX user.
You can create backups on a remote node if the drive is NFS-mounted, or by using a network resource string (NRS) to specify the node name as part of the file name, and ensuring a NetLDI is running on the remote node. Backups cannot be made to a raw partition.
mByteLimit is either a single integer, or an array of integers with the same number of elements as arrayOfFilenames. This argument limits the maximum size of each file, except the last. If mByteLimit is one integer, each backup file will use that value; if it is an array of integers, each file will be limited by the matching entry. A value of 0 means the file sizes are unlimited.
In order to avoid running out of space for the backup, the last file is not limited, regardless of the size limit specified. If the number and size limit of arrayOfFilenames is too small to hold the entire backup, after each of the earlier files reaches its mByteLimit, the last file may grow significantly larger to contain the remainder of the backup.
WARNING
If there is not sufficient space to write the entire backup, the backup will returns an error and deletes the incomplete backup files. Make sure you have sufficient disk space and the appropriate value for mByteLimit.
If you do not want to limit the size of the backup file, specify a mByteLimit of 0.
topaz 1> printit
"Create a full backup of the Repository"
SystemRepository
fullBackupTo: {
'/users/backups/March_20.1' .
'/users/backups/March_20.2' .
'/users/backups/March_20.3'
}
MBytes: 0.
%
true
This writes the backup into three files, named March_20-1, March_20-2, and March_20-3. Messages are written to the stone log indicating when the backup started and when it completed.
During the backup, after the initial period in transaction, the session is put into manual transaction mode so the backup won’t interfere with ongoing garbage collection. When the backup completes, the session is left outside of a transaction. If you want to make changes to the repository after a backup, send System beginTransaction or System transactionMode: #autoBegin.
Backup fails to run or encounters an error
If the backup file already exists, a path cannot be found, or if any of the file names are empty strings, the method returns an error.
If another session is holding the GcLock, the backup will wait for up to 5 minutes for the other operations to complete and release the GcLock, otherwise it will fail and return an error. You can determine the session holding the GcLock by using:
System sessionIdHoldingGcLock
This method will return 0 if no session is holding the GcLock.
Backup (and restore) require at least one extra session be available, beyond the session that is starting the backup. If the number of users logged in is equal to the STN_MAX_SESSIONS setting, the backup will fail with an error.
If backup encounters an error, then any backup files that were created are automatically deleted.
Monitoring and Performance
The following performance and monitoring topics apply to full backups. The performance of on and offline extent snapshot backups depends on your operating system and disk performance and can be monitored and optimized outside of GemStone using OS level tools.
Shared Page Cache Size
You can often improve both backup and restore performance by increasing the size of the shared page cache.
Multi-threading
Full backups are written and restored multi-threaded to allow the reads and file writes to progress in parallel for faster performance.
The maximum number of threads is based on the number of extents in the repository and the number of backup files specified. For backup, threads may be deactivated and system impact reduced using the methods described in Tuning Multi-Threaded Scan. Restore is always done with maximum performance.
The multi-threaded algorithm uses one session per extent in your repository, up to a limit of 16 sessions. If there are not sufficient session slots available – if the number of users logged in is close to the STN_MAX_SESSIONS setting – then the backup or restore will use fewer sessions and performance will be slower. In this case, a message is printed to stdout (the topaz -l terminal) and to the stone log.
Cache Statistics
During the main part of a full backup, the statistic ProgressCount for the session performing the backup indicates the number of objects written to the backup file thus far. If you know the total number of objects in the repository, you can use this statistic to determine how far the backup has progressed.
Backups and Garbage Collection
NOTE
You will find it easier to understand the following discussion if you have first read and understood the section Basic Concepts.
Because shadow objects must be backed up, it is more efficient to run a Smalltalk full backup when there are few shadow objects. If possible, first check the statistic PagesNeedReclaimSize. If that statistic is high, run one or more Reclaim Gem sessions before performing the backup. (See Admin and Reclaim Gems.)
Dead objects waiting to be reclaimed (measured by the statistic DeadNotReclaimedObjs are not backed up, as these objects are going to be deleted anyway.
Compressed Backups
It is possible to write and read full backup files in compressed mode.
Writing to, and reading from, a compressed file can be performed only to a local file system file or to a file system that is NFS-mounted.
Backup files written in compressed mode are automatically appended with the suffix .gz if you do not specify that suffix.
All restore methods automatically detect whether a file is compressed or not and read the file accordingly. Even a backup originally created in uncompressed mode, then later compressed externally with gzip, is readable by restoreFromBackup:.
The following class methods in Repository are provided to create compressed full backups:
fullBackupCompressedTo: filename
This method backs up the receiver to a single backup file in gzip format. The output file is written compressed in gzip format.
fullBackupCompressedTo: arrayOfFilenames MBytes: mByteLimit
This method is similar to fullBackupTo:MBytes: except that the output file is written compressed in gzip format.
Verifying a Backup is Readable
To verify that a backup file is readable, use the GemStone utility copydbf. You can conserve disk space and reduce disk activity by specifying /dev/null as the destination. For instance:
% copydbf /users/backup/March_20-1 /dev/null
Checking Backup Start and Completion
The time a backup is started, and the time that it completes successfully, are written to the stone log. For multi-file backups, only the first filename is listed.
--- 03/25/15 14:55:59 PDT ---
Full backup of the repository has been started.
Host: ip6-localhost ProcessId: 2930
User: DataCurator SessionId: 5
--- 03/25/15 14:57:23 PDT ---
Full backup successfully completed by sessionId 5 to file: bkup.dat
9.5 How to Restore from Backup
There are several circumstances under which you will want to restore from backup.
If you have disk errors or file corruption, or if you encounter object corruption in your repository, you will need to restore from backup and replay transaction logs to recover all work up to the time of the corruption.
Restoring from backup is also used to set up and refresh warm or hot standby systems, and to set up test environments that match production systems.
To make the repository smaller, or to redistribute objects among a different number of extents, or to change your system to use partial logging mode, you must restore from full backup. Restore from full backup may also improve space use and performance by recreating dynamic internal structures.
Note that if your intention is to redistribute objects over a different number of extents, if the number of extents during restore is the same as the number of extents when the backup was started, this takes precedence over the DBF_ALLOCATION_MODE configuration setting during restore. If the number of extents differs, then the DBF_ALLOCATION_MODE setting at the time of the restore controls the distribution of objects across extents.
The ability to restore from backup is critical to the reliability of your GemStone system. You should ensure that you regularly take backups, and from time to time, verify that the processes that you use to make the backups result in complete and usable backup files.
If you are concerned about losing work that is done between backups, ensure that you are in full transaction log mode. In this mode, the transaction logs record all commits in your repository and the transaction logs are not automatically deleted, so they can be replayed into a restored backup if they are needed.
There are two phases of restoring from backup:
Phase 1 - restore the backup. The process will vary depending on if you are restoring from an extent snapshot backup or from a full backup.
- To restore from extent snapshot backups, see Restoring from an Extent Snapshot Backup.
- For restore from a fullbackup, see Restoring from a Full Backup
Phase 2 - restore transaction logs. This phase is only possible in full transaction logging mode. If you are not in full transaction logging mode, any work done after the backup was made will be lost in the restored repository.
After the backup has been restored, the repository reflects its state at the time of the backup. All the objects are intact and ordinarily are clustered in a way similar, but not identical, to their organization in the original repository. This clustering reflects both explicit clustering of objects by the application and default clustering into the generic cluster bucket.
Restore Status
Before, during, and after restore from backup and from transaction logs, you can use the message restoreStatus to determine where you are in the process. This status is an attribute of the repository, not of the session, and persists across login sessions and stopping and restarting the Stone.
topaz 1> printit
SystemRepository restoreStatus
%
Restore is not active
During restore from transaction logs
topaz 1> printit
SystemRepository restoreStatus
%
Restoring from transaction log files, restored to 03/20/15
12:21:41 PDT, nextFileId = 1, record = 409 oldest fileId = 1
Restoring from an Extent Snapshot Backup
This section describes how to restore extent copy backups; that is, backups made using utilities such as cp to take a snapshot of the extent files. In order to recover, this backup must have been made while checkpoints were suspended for the entire time the copy was being made, or while the repository monitor was shut down; and snapshots of each extent must be available.
Figure 9.1 System Timeline: Restoring from a Extent Snapshot Backup
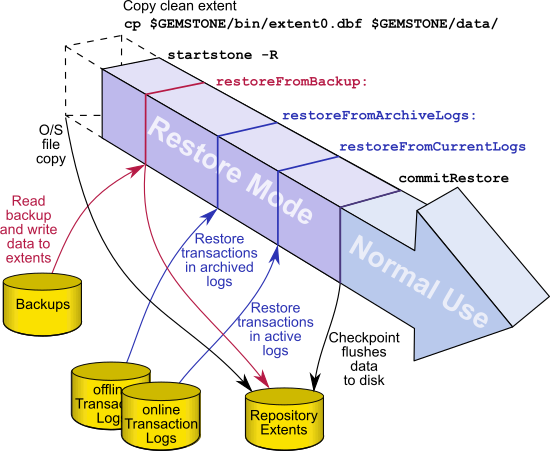
To restore your repository from a extent copy backup, use the following procedure:
Step 1. If GemStone is still running, tell all users to log out and use stopstone to stop the repository monitor.
Step 2. If you are restoring the repository because of a suspected GemStone failure, preserve a copy of the extents in case Technical Support wants to examine them.
Step 3. Delete all extent files specified by DBF_EXTENT_NAMES in your configuration file.
WARNING
Do NOT delete the transaction log files—leave them online in their current locations.
Step 4. Copy the operating system backup copies of the extent files to the locations specified by the DBF_EXTENT_NAMES configuration option.
Step 5. Ensure that there is space to create a log file. At least one of the directories specified by STN_TRAN_LOG_DIRECTORIES must have space available or one of the raw partitions must be empty. You may need to add entries to STN_TRAN_LOG_DIRECTORIES and STN_TRAN_LOG_SIZES in your configuration file.
If full transaction logging (STN_TRAN_FULL_LOGGING = True) was in effect, start in restore mode to restore transaction logs. Use startstone -R to restart GemStone.
If partial transaction logging (STN_TRAN_FULL_LOGGING = False) was in effect at the time the backup was made, tranlogs are not restored. Restart Gemstone by invoking startstone in the usual manner. The restore process is now complete.
Step 7. If in full transaction logging, you can now restore transaction logs.
Continue with How to Restore Transaction Logs.
Restoring from a Full Backup
A GemStone full backup writes the contents of the repository into backup files. When restoring from a full backup, you start with a clean, empty extent, and restore the objects from the backup file into your repository.
Figure 9.2 System Timeline: Restoring from a Smalltalk Full Backup
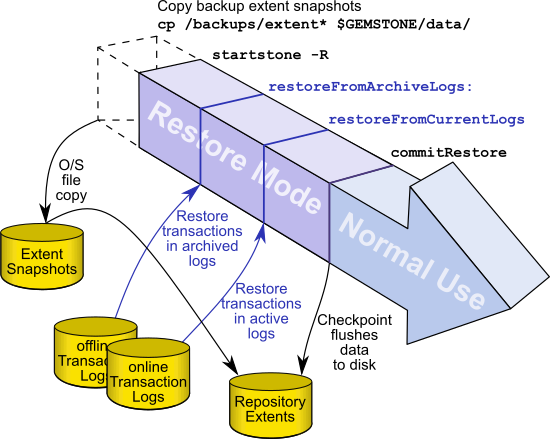
To begin, you need a file copy (not a GemStone backup) of a good repository. We recommend that you use a copy of the extent0.dbf that was shipped in $GEMSTONE/bin, although any extent file that is a complete, uncorrupted repository will work. If you are using the backup/restore process to reduce the size of your extent, the new extent file must be smaller than your current extent.
Make sure that you have all backup files are complete. If the backup consists of multiple files, the complete set must be available.
The user restoring the backup must be the only user logged in to the server. The method that starts the restoration will suspend other logins.
NOTE
We recommend that you log in as DataCurator or SystemUser to restore the backup. If you start the restore as another user and that UserProfile disappears as a result of the restore, Topaz will see a fatal error.
To restore your repository from a Smalltalk full backup, use the following procedure:
Step 1. If GemStone is still running, tell all users to log out and use stopstone to stop the system.
Step 2. If you are restoring the repository because of a suspected GemStone failure, preserve a copy of the extents in case Technical Support wants to examine them.
Step 3. Delete all extent files specified in DBF_EXTENT_NAMES in your configuration file.
WARNING
Do NOT delete the transaction log files up to the time of the crash—leave them online in their current locations.
Step 4. Copy the clean, empty extent to the location of your primary extent, which is the extent listed first in DBF_EXTENT_NAMES.
Make sure there are no other extent files in that location. Do not copy any other extent files to the extent location. If you have more than one extent, the Stone repository monitor will create the new extents at startup.
Use chmod to give the clean extent copy the same permissions you ordinarily assign to your repository files.
% copydbf $GEMSTONE/bin/extent0.dbf $GEMSTONE/data/extent0.dbf
% chmod 600 $GEMSTONE/data/extent0.dbf
Step 5. Ensure that there is space to create a log file. At least one of the directories specified by STN_TRAN_LOG_DIRECTORIES must have space available or one of the raw partitions must be empty. You may need to add entries to STN_TRAN_LOG_DIRECTORIES and STN_TRAN_LOG_SIZES in your configuration file.
Step 6. Use startstone -R to restart the Stone.
The -R option starts the stone in restore mode and avoids creating an orphan transaction log.
For optimal performance, your extent files should be pre-grown during startup, rather than growing incrementally during restore. See Pregrowing Extents to a Fixed Size.
Step 7. Log in to GemStone as DataCurator or SystemUser using linked Topaz (topaz -l). Remember that the password will be the original one supplied when you installed GemStone, not necessarily the one you have been using.
NOTE
To perform the following steps, you must be the only user logged in to GemStone. Once you start the next step, other logins will be suspended.
Step 8. Restore the most recent full backup to the new repository by sending the message restoreFromBackup: or restoreFromBackups:. These methods automatically detect whether a backup is compressed or not and reads it accordingly.
topaz 1> printit
SystemRepository restoreFromBackup: 'backup.gz'
%
To restore from a multi-file backup, you must specify all the files in the backup, in the order the backups were created.
topaz 1> printit
SystemRepository restoreFromBackups:
#( '/users/backups/March_20.1'
'/users/backups/March_20.2'
'/users/backups/March_20.3')
%
When restore from backup is complete, the session logs out.
[Info]: Logging out at 03/20/15 12:21:41 PDT
The restore from backup completed, with 97655 objects restored.
Ready for restore from transaction log(s).
If partial logging was in effect (STN_TRAN_FULL_LOGGING = false) at the time the backup was made, the final status line reads:
Restore complete. (Backup made while in partial logging mode.)
This status means that transaction logs cannot be restored. The repository is ready for ordinary use, and logins have been enabled.
If an error occurs during the restore, the system returns to the state it was in before restore. Determine the cause of the error and correct it, and return to Step 7.
Step 9. If full logging was in effect (STN_TRAN_FULL_LOGGING = true), the status line indicates the next step:
Ready for restore from transaction log(s).
Continue with How to Restore Transaction Logs.
Controlling Reclaim Activity When Restore Completes
During restore, pages that contain free space are by default not added to the scavengeable pages at the end of the restore. This avoids a load on the reclaim gems immediately after the commitRestore. In the normal course of operations as repository objects are operated on, pages with free space will tend to be reclaimed over time.
This can be controlled, so that pages with a specific percentage of free space are made scavengeable, so they will be reclaimed after the commitRestore. This will result in the largest amount of free space after this initial reclaim, at the expense of heavy reclaim load on the repository shortly after startup. Since reclaim requires pages, you should use some caution to avoid running out of free space before the newly reclaimed pages become available.
To explicitly specify the page free space percentage required to add pages tot he scavengeable pages list, use the method Repository >> restoreFromBackups: arrayOfFileNames scavengePagesWithPercentFree: aPercent.
A aPercent value of 100 means no pages are added (the default), while 0 means pages with any free space at all are added.
topaz 1> printit
SystemRepository restoreFromBackups:
#( '/users/backups/March_20.1'
'/users/backups/March_20.2'
'/users/backups/March_20.3')
scavengePagesWithPercentFree: 90
%
9.6 How to Restore Transaction Logs
The second phase of restoring the repository is to roll forward from the state at the starting point of the last backup to the state of the last committed transaction. This action repeats the transactions in the order in which they were committed.
You can do this only if the STN_TRAN_FULL_LOGGING configuration option was set to True at the time the backup was made. You cannot restore transaction logs that are not part of a sequence of tranlogs that includes the backup. Since restore breaks this sequence, the transactions being restored cannot span a more recent restore.
Note that while backup files can be written in either uncompressed or compressed format, transaction logs are always written in uncompressed format. However, transaction logs may be compressed with gzip before archiving them. These compressed tranlogs can be restored directly, without having to manually run gunzip on them.
At this point, GemStone should be running and in restore mode, following a restore from either an extent snapshot backup or from a full backup. The following steps describe the most common case of restoring the transaction logs.
CAUTION
Ordinarily, you will restore transactions from all log files written since the backup. If for some reason you plan to omit one or more log files, refer to the section Special Cases and Errors in Restore.
Step 1. Log in to GemStone as DataCurator or SystemUser using linked Topaz (topaz -l).
Step 2. Determine which transaction logs are needed for restore and their locations. The method restoreStatus identifies the earliest transaction log that is needed. In this example it is tranlog6.dbf:
topaz 1> printit
SystemRepository restoreStatus
%
Restoring from Transaction Log files,
restored to 03/02/15 13:26:31 PST
next fileId = 6, record = 9.
Compare the fileId in the message with the names of the transaction log files in the directories specified in STN_TRAN_LOG_DIRECTORIES. For transaction logs in the file system, fileId forms the numeric portion of the file name, tranlogNN.dbf. For transaction logs in raw partitions, use copydbf -i fileName to display the fileId.
Transaction log files that are located in a directory specified in STN_TRAN_LOG_DIRECTORIES are “current”. If some required transaction logs have been moved to another location, they are “archive” logs, and are restored using a different method.
Step 3. Restore archive transaction logs, if any.
If any of the tranlogs to be restored are not in one of the current tranlog directories, collect the names of directories containing all these archive logs, and restore using Repository>>restoreFromArchiveLogs: or related methods.
You will have to login prior to running this step.
topaz 1> printit
SystemRepository restoreFromArchiveLogs:
#( 'GS-archive' )
%
See the method comments in the image for details. A directory location can include an NRS for a remote node, but a NetLDI must be running on that node.
If you encounter a failure because of a truncated or corrupted transaction log, refer to Errors While Restoring Transaction Logs.
Step 4. Before continuing to restore tranlogs, you must log in again. Restore operations terminate the session when complete.)
Step 5. Restore transactions from the current log files by executing the method Repository>>restoreFromCurrentLogs. All the remaining log files must be in directories or raw partitions specified in STN_TRAN_LOG_DIRECTORIES.
topaz 1> printit
SystemRepository restoreFromCurrentLogs
%
Restore from transaction log(s) succeeded.
Step 6. If restoration from the transaction logs was successful, send the message commitRestore to tell the system that you are finished restoring. After this, no further logs can be restored, and normal user commits will be allowed.
You will have to login again prior to running this step.
topaz 1> printit
SystemRepository commitRestore
%
Restore from transaction log(s) succeeded. commitRestore succeeded
If you send commitRestore prior to restoreFromCurrentLogs, a warning is issued because all previously committed transactions may not have been restored. However, this usage provides a way to recover as much as is available when a log file has been corrupted or lost.
Step 7. Make a new GemStone backup as soon as operational circumstances permit.
9.7 Special Cases and Errors in Restore
If all transaction logs needed to restore up to the current time are available, transaction log restore is simple. However, in some cases transaction logs may be missing or corrupt, or you may wish to restore to an earlier point in time. This section describes these special cases and problems that you may encounter during transaction log restore.
Precautions When Restoring a Subset of Transaction Logs
When you determine the need restore an incomplete set of transaction logs, be aware of the likely consequences:
- Obviously, the omitted transactions will be lost. Presumably that is unavoidable or intentional.
- Less obviously, it may be impossible to reverse your action later and restore the omitted logs. Operations after the first commitRestore create a time fork in the repository, and attempting to reverse the course later results in inconsistent data and object audit errors. For a detailed example illustrating this, see the following discussion on Fork-in-Time Scenario.
If there is any chance that you may want to restore from the omitted transaction logs later, prior to restore archive the repository backup and all transaction logs required for complete restore to a separate location. The transaction logs should not be on any directory listed in STN_TRAN_LOG_DIRECTORIES.
Later, if you wish to perform a second restore, you can repeat the entire restore process, including restoring any omitted transaction logs.
Since any new work done in the partially restored system constitutes a “Fork-in-Time”, the work done after the partially restored system’s commitRestore cannot be restored to this second restored system. That work will be lost.
Fork-in-Time Scenario
In some cases, you may encounter problems with restoring from your most recent backup file and must restore from an earlier backup. This scenario presents a risk of transaction logs that are out of sequence due to a “fork-in-time.” Consider the following sequence of repository events:
2. Generate transaction logs tranlog1, tranlog2, tranlog3.
4. Generate transaction logs tranlog4, tranlog5, tranlog6.
6. commitRestore (without replaying transaction logs tranlog4, tranlog5, tranlog6).
The repository is now at same state as Step 3.
7. Generate transaction logs tranlog7, tranlog8, tranlog9.
9. Replay transaction logs tranlog1 through tranlog9.
In terms of the repository lifecycle, this scenario has two timelines, with a fork-in-time at the end of tranlog3:

If, at step 5, we also restored the transaction logs (tranlog4, tranlog5, tranlog6), the resulting sequence could be replayed without problems. The problem is caused when the continuity of the transaction log chain is broken.
After restoring backup1 in step 8, it would be possible to safely replay transaction logs tranlog1 through tranlog6 without problems, but any changes made in (tranlog7, tranlog8, tranlog9) would be lost.
During step 9, the replay of (tranlog7, tranlog8, tranlog9) is likely to produce problems. If any object changes made in (tranlog4, tranlog5, tranlog6) are logically inconsistent with those made in (tranlog7, tranlog8, tranlog9), possible errors are wide-ranging, including UTL_ASSERT/UTL_GUARANTEE errors or errors of the form:
recovery/restore: invalid operation XXXXXXXXXX
Transaction expected to abort.
non-empty invalidObjs in recover.c:commitTran
In the worst case, errors may not be written to the Stone log during transaction log replay, but the final repository may be corrupted in obscure ways. If the corruption is structural, it may be detected by an object audit (described here). Otherwise, the corruption may go undetected unless picked up by application code.
If you are presented with a situation wherein you are forced to restore from an earlier backup, keep in mind the following:
1. Be aware of the fork-in-time phenomenon and avoid restore/replay operations that would create a fork.
2. When restoring into an ongoing transaction log sequence, only restore a backup file generated earlier within that same sequence, and then replay all transaction logs in that sequence generated since that backup.
3. If for some reason you cannot follow guideline 2, realize that you cannot restore from an earlier backup and replay transaction logs beyond the point of the initially restored backup.
Restoring Logs up to a Specific Log
To restore transaction logs, stopping at a specific log, execute Repository>>restoreToEndOfLog:fileId. This restores all transaction logs up to and including the specified transaction log. All tranlogs from the next tranlog required through the specified tranlog must be available. For example:
topaz 1> printit
SystemRepository restoreStatus
%
Restoring from Transaction Log files,
restored to 03/02/15 13:51:19 PST
next fileId = 7, record = 0 oldest fileId = 7
topaz 1> printit
SystemRepository restoreToEndOfLog: 15
%
[Info]: Logging out at 03/24/15 14:37:07 PDT
Restore from transaction log(s) succeeded.
If the transaction logs to be restored are in a archive location, use the similar methods restoreFromArchiveLogs:toEndOfLog: or restoreFromArchiveLogs:toEndOfLog:withPrefix:.
topaz 1> printit
SystemRepository restoreStatus
%
Restoring from Transaction Log files, restored to 03/02/15
13:51:19 PST, next fileId = 7, record = 0 oldest fileId = 7
topaz 1> printit
SystemRepository
restorefromArchiveLogs: #(GS-archive)
toEndOfLog: 15
%
[Info]: Logging out at 03/24/15 14:37:07 PDT
Restore from transaction log(s) succeeded.
Restoring Logs to a Point in Time
Ordinarily, the methods to restore one or more transaction logs restores each individual transaction within the log file. However, you can specify an earlier stopping point and restore only part of a transaction log, by sending one of the following messages:
restoreToPointInTime: aDateTime
restoreFromArchiveLogs: arrayOfDirSpec toPointInTime: aDateTime
restoreFromArchiveLogs: arrayOfDirSpec toPointInTime: aDateTime
withPrefix: tranlogPrefix
Restoration will stop at the first repository checkpoint that originally occurred at or after aDateTime. This may be several minutes after aDateTime, depending on the checkpoint frequency in the transaction log.
To display the time a transaction log was started and the time of each checkpoint recorded in it, use copydbf -I fileName. By default, the interval between checkpoints is five minutes. For example:
% copydbf -I tranlog2.dbf
Source file: tranlog2.dbf
file type: tranlog fileId: 2
byteOrder: Sparc (MSB first) compatibilityLevel: 910
The file was created at: 03/25/15 14:55:59 PDT.
The previous file last recordId is 69.
Scanning file to find last checkpoint...
Checkpoint 1 started at: 03/25/15 14:55:59 PDT.
oldest transaction references fileId -1 ( this file ).
Checkpoint 2 started at: 03/25/15 14:57:23 PDT.
oldest transaction references fileId -1 ( this file ).
File size is 2.2 MBytes (4350 records).
The method to use to restore to a point in time depends on if the logs are archive (not in a directory on STN_TRAN_LOG_DIRECTORIES), or online (in a directory used for current transaction logs).
If the point in time that you wish to restore to occurs in an current/online transaction log, first restore any archives logs using restoreFromArchiveLogs:.
Then, restore all current logs up to a specified time. The following example restores the repository to the first checkpoint that would have included a commit on March 22, 2015 at 2:56:00 p.m.:
topaz 1> printit
SystemRepository restoreToPointInTime:
(DateTime fromString: '22/03/2015 14:56:00').
%
To restore to a point in time that is in an archived tranlog, use the method restoreFromArchiveLogs:toPointInTime: or
restoreFromArchiveLogs:toPointInTime: withPrefix:. This second method allows you to also specify alternate file prefixes, if you rename files as part of the archive process.
The following sequence restores the repository to the first checkpoint that would have included a commit on March 22, 2015 at 2:56:00 p.m.:
topaz 1> printit
SystemRepository restoreFromArchiveLogs:
#( 'GS-archive' )
toPointInTime:
(DateTime fromString: '22/03/2015 14:56:00').
%
You can continue restoring past aDateTime by issuing further restore messages.
Errors While Restoring Transaction Logs
Missing Transaction Log File
If a transaction log file in the sequence is missing, the tranlog restore stops at that point, and reports an error if it detects the existence of later transaction logs.
For example, if you have tranlog1.dbf through tranlog10.dbf, but tranlog4.dbf is missing, restoreFromCurrentLogs stops after restoring from tranlog3.dbf.
topaz 1> printit
SystemRepository restoreFromCurrentLogs.
%
[Info]: Logging out at 03/02/15 13:26:31 PST
ERROR 4049 , Restore from transaction log failed,
EndOfAllLogs reached after fileid 3 before last log for
recovery 10 found.
The tranlog after the one reported in the error is the one that is missing. You can also execute the method restoreStatus to identify the next log file explicitly. Locate the missing file or files, and then continue the restore process.
Truncated or Corrupt Transaction Log File
If a transaction log is truncated or corrupt, it may not be noticed until the next transaction log is restored. This may occur, for example, if you have an undetected disk full condition when copying a transaction log.
The truncated log may restore successfully, but when the next log is restored, the gap is detected and the error is reported.
In the following example, tranlog6.dbf is truncated, and restoreFromCurrentLogs reports an error.
topaz 1> printit
SystemRepository restoreFromCurrentLogs
%
[Info]: Logging out at 03/24/15 14:37:07 PDT
ERROR 4049 , Restore from transaction log failed
Log with fileId 6 is truncated or corrupt, or log 7 is corrupt.
Logging in again and checking the restore status confirms that tranlog6.dbf is incomplete:
topaz 1> printit
SystemRepository restoreStatus
%
Restoring from Transaction Log files, restored to 03/02/15
13:51:19 PST, next fileId = 6, record = 4409 oldest fileId = 6
After locating a complete, uncorrupted copy of tranlog6.dbf, it is copied into the appropriate directory and the restore is done again:
topaz 1> printit
SystemRepository restoreFromCurrentLogs
%
[Info]: Logging out at 03/24/15 14:37:07 PDT
Restore from transaction log(s) succeeded.
You can verify that this and any later transaction logs were restored by logging in again and checking the restore status:
topaz 1> printit
SystemRepository restoreStatus
%
Restoring from Transaction Log files, restored to 03/02/15
13:51:19 PST, next fileId = 11, record = 4409 oldest fileId = 11
Since in this case all available transaction logs are now successfully restored, login again and commit the restored repository:
topaz 1> printit
SystemRepository commitRestore
%
Restore from transaction log(s) succeeded., commitRestore succeeded
If you cannot find an undamaged copy of the transaction log, you cannot restore any further logs. Executing commitRestore will commit as much as has been restored. However, if there is any chance of a finding a good copy, see the discussion,“Precautions When Restoring a Subset of Transaction Logs”.
Recovering from File System Problems
We recommend disk or operating system mirroring for applications that cannot tolerate the risk of data loss. In particular, recent transaction logs should be mirrored, or at minimum copied to an archive location on a frequent basis. In the case of a disk failure or a corrupt file system, if any of the transaction logs created since the last backup are corrupt or unusable, this recent work may be permanently lost.
In the case of disk failure or a corrupt file system, the file system must be repaired or restored. The most reliable strategy is to restore GemStone from backup, restoring copies of all transaction logs for which you have uncorrupted copies.
However, if you have important work that may be lost, you may want to attempt recovery of the existing repository. If each of these steps completes successfully, your repository is uncorrupted and you can resume normal operations.
Execute pageaudit per the instructions under Page Audit, to verify page-level integrity of the repository.
Execute objectAudit per the instructions under Object Audit and Repair to verify objects in the repository. This may take some time.
Some types of objectAudit failures indicate corruption in internal GemStone structures, which are rebuilt during restore of a full backup. If objectAudit reports errors, it may be worthwhile to attempt to make a fullBackup of the repository. If this succeeds, restoring it may provide a uncorrupted repository.