2. Configuring the GemStone Server
This chapter tells you how to configure the GemStone server processes, repository, transaction logs, and shared page cache to meet the needs of a specific application. It includes the following topics:
This chapter describes configuring the GemStone server; for information about configuring session processes for clients, refer to Chapter 3.
For instructions on starting up the GemStone server, and troubleshooting, see Chapter 6.
2.1 Server Components
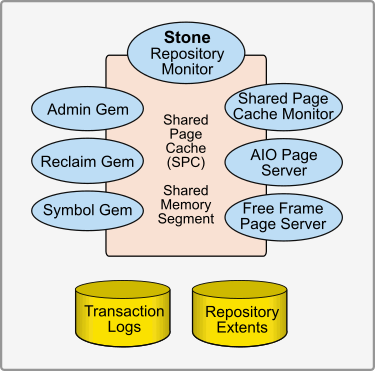
The Server is the heart of the GemStone Object Repository. The GemStone server holds the shared classes and objects that compose your data and the shared portion of your application. These classes and objects are written to disk for reliability, and cached in memory for performance. A number of processes work together to keep the GemStone repository running smoothly and support multiple users with different demands and requirements.
The server components are shown in Figure 2.1.

The Server Configuration File
At start-up time, GemStone reads a system-wide configuration file. By default this file is $GEMSTONE/data/system.conf, where GEMSTONE is an environment variable that points to the directory in which the GemStone software is installed.
Appendix A, “GemStone Configuration Options”, describes the various ways to specify the configuration file to use, and syntax of this file, as well as describing each individual configuration parameter.
There are a large number of configuration options; some are specific to the Stone, some for Gems, others used by all processes. Most parameters have default values that apply if the parameter is not explicitly set, or if there is a syntax error.
Before you begin
To configure GemStone, is necessary to know or estimate the following:
- The number of simultaneous sessions that will be logged in to the repository. This may include more than one session per user. You should size your system to accommodate the maximum number of users, plus a few extra for administrative logins.
- The approximate size of your repository, and how much you expect it to grow. For a new system, it may be impossible to come up with a realistic number. The example configurations described in Example Configurations may give you some idea, but application requirements vary widely.
Number of User Sessions
The maximum number of users is set by the configuration parameter STN_MAX_SESSIONS. This defaults to 40, but on startup, the Stone checks for keyfile limits, and if your licensed limit is less than 40, the maximum number of sessions allowed by the keyfile is applied.
Since the Shared Page Cache (SPC) allows space for the maximum number of sessions, setting this much larger than you require creates some unnecessary overhead. However, if at some point you do need more sessions than you have configured as the limit, the cache and stone must be restarted with the larger configuration value.
This limit is for user sessions, and does not need to accommodate logins for GemStone server processes (such as the Garbage Collection Gems). However, some operations that affect the system, including multithreaded administrative operations, may require additional sessions from the user session count.
The SHR_PAGE_CACHE_NUM_PROCS is normally derived from STN_MAX_SESSIONS, but may be explicitly set on some systems. This limit must accommodate the GemStone system processes as well as the number of user sessions.
Shared Page Cache
The Shared Page Cache (SPC), a shared memory segment that all Server processes attach to, is central to the operation and performance of your repository.
Sizing the shared page cache is an important decision. For performance, the shared cache should be sized as large as possible for the given RAM, while allowing some overhead for other memory requirements; and ensuring that the cache does not swap out of memory.
Each Stone has a single shared page cache on its own node, and may have remote page caches on other nodes in distributed configurations (discussed in detail in Chapter 5). The configurations for remote shared pages caches may be different than for the Stone’s shared page cache.
Estimating the Size of the Shared Page Cache
The goal in sizing the shared page cache is to make it large enough to hold the application’s working set of objects, to avoid the performance overhead of having to read pages from the disk extents. In addition, it is important that the pages that make up the object table, which holds pointers to the data pages, can fit in the shared page cache.
At the same time, there should be sufficient extra memory available over and above what the shared page cache requires, to allow for other memory caches, heap space, etc.
In general, the shared page cache should be configured at no more than 75% of the available memory, though the actual limit depends on the absolute amount of memory, and factors such as Gem temporary object cache size, and other loads on the system.
- For maximum performance, the shared page cache can be made large enough to hold the entire repository. After cache warming, sessions should always find the objects in the cache, and never have to perform page reads.
- Configuring the shared page cache as large as possible up to the size of the repository and about 75% of system RAM is recommended for the best performance.
- A shared page cache size of less than 10% of your repository size may not hold the entire object table, and is likely to see performance degradation.
Once your application is running, you can refine your estimate of the optimal cache size by monitoring the free space, and use this to tune your configuration. See Monitoring Performance; some relevant statistics are NumberOfFreeFrames, FramesFromFreeList, and FramesFromFindFree.
For example, if you have 2GB of RAM, to set the size of the shared page cache to 1.5 GB:
SHR_PAGE_CACHE_SIZE_KB = 1500 MB;
Verifying OS support for sufficient Shared Memory
To ensure that your OS has enough memory to handle the desired cache size:
Step 1. Ensure that your OS is configured to allow shared memory segments of the intended size, as described in the Installation Guide for your platform.
Step 2. The shared page cache sizing depends in part on the maximum number of sessions that will be logged in simultaneously. Ensure that the STN_MAX_SESSIONS configuration option is set correctly for your application requirements.
Step 3. Use GemStone’s shmem utility to verify that your OS kernel supports the chosen cache size and number of processes. The command line is
$GEMSTONE/install/shmem existingFile cacheSizeKB numProcs
- $GEMSTONE is the directory where the GemStone software is installed.
- existingFile is the name of any writable file, which is used to obtain an id (the file is not altered).
- cacheSizeKB is the SHR_PAGE_CACHE_SIZE_KB setting.
- numProcs is the value calculated for SHR_PAGE_CACHE_NUM_PROCS. It is computed by STN_MAX_SESSIONS + STN_MAX_GC_RECLAIM_SESSIONS + SHR_NUM_FREE_FRAME_SERVERS + STN_NUM_LOCAL_AIO_SERVERS + 8. For an existing system, you can find the computer value in the Stone log file.
For instance, for a 1.5 GB shared cache and numProcs calculated using all default configuration settings:
% touch /tmp/shmem
% $GEMSTONE/install/shmem /tmp/shmem 1500000 52
% rm /tmp/shmem
If shmem is successful in obtaining a shared memory segment of sufficient size, no message is printed. Otherwise, diagnostic output will help you identify the kernel parameter that needs tuning. The total shared memory requested includes cache overhead for cache space and per-session overhead. The actual shared memory segment in this example would be 104865792 bytes (your system might produce slightly different results).
2.2 Configuring Extents and Transaction Logs
The extents and transaction logs hold the disk-based storage of your GemStone objects. You must configure the location and sizes for these, ensuring that disk I/O does not limit performance.
Recommendations About Disk Usage
If you are using a SAN or a disk using some RAID configurations, the follow discussion is not entirely applicable, since the distribution to physical media is handled for you and GemStone’s configuration may not affect I/O contention. However, if you see I/O performance issues you may need to review your disk configuration.
A file system on an SSD is will give the fastest performance for transaction logs, and is easier to manage than raw partitions. The SSD should be an NVMe device or PCIe card or be in a storage array with high bandwidth connection (rather than connected by SATA), if very high IO rates are needed. File system extents on SSD are also highly performant.
If you are setting up a large repository and you do not have a SAN or RAID disks, it is recommended that you configure your system with three or more separate physical drives for improved performance. Performance bottlenecks can occur in reading or writing to the extents or in updating the transaction logs.
When developing your configuration, bear in mind the following guidelines:
1. Keep extents and transaction logs separate from a drive with operating system swap space.
2. Keep the extents and transaction logs separate from each other. You can place multiple logs on the same disk, since only one log file is active at a time.
3. Transaction logs can be placed on SSD drives or raw partitions for the best performance in update-intensive systems. Using raw partitions requires two or more partitions to allow switching.
4. Using multiple extents on multiple drives (provided they are actually separate, not a logical partition) can improve performance, particularly if your repository is large relative to your shared page cache size. To benefit from multiple extents on multiple disks, you must use weighted allocation mode. For details about weighted allocation, see Allocating Data to Multiple Extents.
Raw Partitions
Each raw disk partition is like a single large sequential file, with one extent or one transaction log per partition.
Usually, placing extents on file systems is as fast as using raw partitions. It is possible for this to yield better performance, if it reduces swapping; but your configuration should be designed to avoid swapping in any case.
Placing transaction logs on raw partitions is likely to yield better performance, particularly in an update-intensive application, since such applications primarily are writing sequentially to the active transaction log. Using raw partitions can improve the maximum achievable commit rate by avoiding the extra file system operations necessary to ensure that each log entry is recorded on the disk.
Transaction logs use sequential access exclusively, so the devices can be optimized for that access.
Because each partition holds a single log or extent, if you place transaction logs in raw partitions, you must provide at least two such partitions so that GemStone can preserve one log when switching to the next. The transaction log in each partition must be archived and cleared while the other transaction log is being updated. If your application has a high transaction volume, you are likely to need additional raw partitions for more logs.
For information about using raw partitions, see How To Set Up a Raw Partition.
Configuring the Repository Extents
Configuring the repository extents involves these primary considerations:
Estimating Extent Size
When you estimate the size of the repository, allow 10 to 20% for fragmentation. Also allow at least 0.5 MB of free space for each session that will be logged in simultaneously. In addition, while the application is running, overhead is needed for objects that are created or that have been dereferenced but are not yet removed from the extents. The amount of extent space required for this depends strongly on the particular application and how it is used.
Reclaim operations and sessions with long transactions may also require a potentially much larger amount of extent free space for temporary data. To avoid the risk of out of space conditions, it is recommended to allow a generous amount of free space.
If there is room on the physical disks, and the extents are not at their maximum sizes as specified using DBF_EXTENT_SIZES, then the extents will grow automatically when additional space is needed.
The extent sizes and limits that the system uses are always in multiples of 16MB; using a number that is not a multiple of 16MB results in the next smallest multiple of 16MB being actually used.
If the free space in extents falls below a level set by the STN_FREE_SPACE_THRESHOLD configuration option, the Stone takes a number of steps to avoid shutting down. However, if these steps are not effective, the Stone will shut down. For information, see Recovering from Disk-Full Conditions.
For planning purposes, you should allow additional disk space for making GemStone backups and for making a copy of the repository when upgrading to a new release. A GemStone full backup may occupy 75% to 90% of the total size of the extents, depending on how much space is free in the repository at the time.
Choosing the Extent Location
You should consider the following factors when deciding where to place the extents:
- Keep extents on a spindle different from operating system swap space.
- Where possible, keep the extents and transaction logs on separate spindles.
Specify the location of each extent in the configuration file. Two examples:
DBF_EXTENT_NAMES = $GEMSTONE/data/extent0.dbf
DBF_EXTENT_NAMES = /disk1/gemstone/dbf1.dbf,
/disk2/gemstone/dbf2.dbf,
/disk3/gemstone/dbf3.dbf;
Extent disk configuration
Extents benefit from efficiency of both random access (16 KB repository pages) and sequential access. Don’t optimize one by compromising the other. Sequential access is important for such operations as garbage collection and making or restoring backups. Using RAID devices or striped file systems that cannot efficiently support both random and sequential access may reduce overall performance. Simple disk mirroring may be give better results.
Setting a Maximum Size for an Extent
You can specify a maximum size in MB for each extent through the DBF_EXTENT_SIZES configuration option. When the extent reaches that size, GemStone stops allocating space in it. If no size is specified, which is the default, GemStone continues to allocate space for the extent until the file system or raw partition is full.
For best performance using raw partitions, the maximum size should be 16MB smaller than the size of the partition, so that GemStone can avoid having to handle system errors. For example, for a 2 GB partition, set the size to 1984 MB.
Each size entry is for the corresponding entry in the DBF_EXTENT_NAMES configuration option Use a comma to mark the position of an extent for which you do not want to specify a limit.
The first example here specifies the size of a single extent, while the second specifies sizes of the first and third extents:
DBF_EXTENT_SIZES = 500MB;
DBF_EXTENT_SIZES = 1GB, , 500MB;
Pregrowing Extents to a Fixed Size
Allocating disk space requires a system call that introduces run time overhead. Each time an extent is expanded (Figure 2.2), your application must incur this overhead and then initialize the added extent pages.
Figure 2.2 Growing an Extent on Demand

You can increase I/O efficiency while reducing file system fragmentation by instructing GemStone to allocate an extent to a predetermined size (called pregrowing it) at startup.
You can specify a pregrow size for each extent through the DBF_PRE_GROW configuration option. When this is set, the Stone repository monitor allocates the specified amount of disk space when it starts up with an extent that is smaller than the specified size. The extent files can then grow as needed up to the limit of DBF_EXTENT_SIZES, if that is set, or to the limits of disk space.
Pregrowing extents avoids repeated system calls to allocate and initialize additional space incrementally. This technique can be used with any number of extents, and with either raw disk partitions or extents in a file system.
The disadvantages of pregrowing extents are that it takes longer to start up GemStone, and unused disk space allocated to pregrown extents is unavailable for other purposes.
During startup, the Stone starts additional page server processes to handle the pregrow.
Pregrowing Extents to the Maximum Size
You may pregrow extents to the maximum sizes specified in DBF_EXTENT_SIZES by setting DBF_PRE_GROW to True, rather than to a list of pregrow sizes.
Pregrowing extents to the maximum size provides a simple way to reserve space on a disk for a GemStone extent. Since extents cannot be expanded beyond the maximum specified size, the system should be configured with sufficiently large extent sizes that the limit will not be reached, to avoid running out of space.
Figure 2.3 Pregrowing an Extent

Two configuration options work together to pregrow extents. DBF_PRE_GROW enables the operation, and optionally sets a minimum value to which to size that extent. When DBF_PRE_GROW is set to True, the Stone repository monitor allocates the space specified by DBF_EXTENT_SIZES for each extent, when it creates a new extent or starts with an extent that is smaller than the specified size. It may also be set to a list of sizes, which sets the pregrow size individually for each extent to a value that is smaller than DBF_EXTENT_SIZES.
For example, to pregrow extents to the maximum size of 1 GB each:
DBF_EXTENT_SIZES = 1GB, 1GB, 1GB;
DBF_PRE_GROW = TRUE;
To pregrow extents to 500M, but allow them to later expand to 1 GB if GemStone requires additional space, and that disk space is available:
DBF_EXTENT_SIZES = 1GB, 1GB, 1GB;
DBF_PRE_GROW = 500MB, 500MB, 500MB;
Allocating Data to Multiple Extents
Larger applications may improve performance by dividing the repository into multiple extents. Assuming the extents are on multiple spindles or the disk controller manages files as if they were, this allows several extents to be active at once.
The setting for the DBF_ALLOCATION_MODE configuration option determines whether GemStone allocates new disk pages to multiple extents by filling each extent sequentially or by balancing the extents using a set of weights you specify. Weighted allocation yields better performance because it distributes disk accesses.
Sequential Allocation
By default, the Stone repository monitor allocates disk resources sequentially by filling one extent to capacity before opening the next extent. (See Figure 2.4) For example, if a logical repository consists of three extents named A, B, and C, then all of the disk resources in A will be allocated before any disk resources from B are used, and so forth. Sequential allocation is used when the DBF_ALLOCATION_MODE configuration option is set to SEQUENTIAL.
Weighted Allocation
For weighted allocation, you use DBF_ALLOCATION_MODE to specify the number of extent pages to be allocated from each extent on each allocation request. The allocations are positive integers in the range 1..40 (inclusive), with each element corresponding to an extent of DBF_EXTENT_NAMES. For example:
DBF_EXTENT_NAMES = a.dbf, b.dbf, c.dbf;
DBF_ALLOCATION_MODE = 12, 20, 8;
You can think of the total weight of a repository as the sum of the weights of its extents. When the Stone allocates space from the repository, each extent contributes an allocation proportional to its weight.
NOTE
We suggest that you avoid using very small values for weights, such as “1,1,1”. It’s more efficient to allocate a group of pages at once, such as “10,10,10”, than to allocate single pages repeatedly.
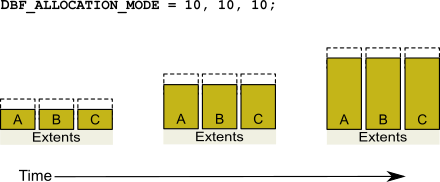
One reason for specifying weighted allocation is to share the I/O load among a repository’s extents. For example, you can create three extents with equal weights, as shown in Figure 2.5.
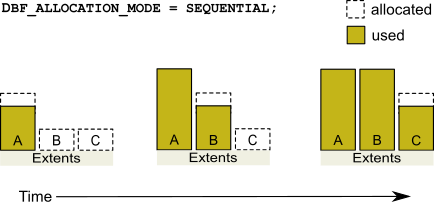
Figure 2.5 Equally Weighted Allocation
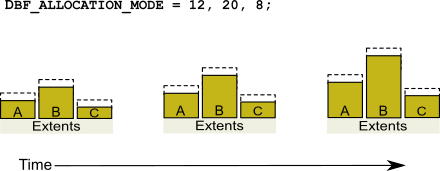
Although equal weights are most common, you can adjust the relative extent weights for other reasons, such as to favor a faster disk drive. For example, suppose we have defined three extents: A, B, and C. If we defined their weights to be 12, 20, and 8 respectively, then for every 40 disk units (pages) allocated, 12 would come from A, 20 from B, and 8 from C. Another way of stating this formula is that because B’s weight is 50% of the total repository weight, 50% of all newly-allocated pages are taken from extent B. Figure 2.6 shows the result.
Figure 2.6 Proportionally Weighted Allocation
You can modify the relative extent weights by editing your GemStone configuration file to modify the values for DBF_ALLOCATION_MODE, or to change DBF_ALLOCATION_MODE to SEQUENTIAL; the new allocation scheme take effect the next time you start GemStone. The changes do not affect existing page allocations, only how pages are allocated for ongoing page requirements.
Effect of Clustering on Allocation Mode
Explicit clustering of objects using instances of ClusterBucket that explicitly specify an extentId takes precedence over DBF_ALLOCATION_MODE. For information about clustering objects, refer to the Programming Guide.
Weighted Allocation for Extents Created at Run Time
Smalltalk methods for creating extents at run time (Repository>>createExtent: and Repository>>createExtent:withMaxSize:) do not provide a way to specify a weight for the newly-created extent. If your repository uses weighted allocation, the Stone repository monitor assigns the new extent a weight that is the simple average of the repository’s existing extents. For instance, if the repository is composed of three extents with weights 6, 10, and 20, the default weight of a newly-created fourth extent would be 12 (36 divided by 3).
Configuring the Transaction Logs
Configuring the transaction logs involves considerations similar to those for extents:
- Providing sufficient disk space
- Minimizing I/O contention
- Providing fault tolerance, through the choice of logging mode
Logging Mode
GemStone provides two modes of transaction logging:
- Full logging, the default mode, provides real-time incremental backup of the repository. Deployed applications should use this mode. All transactions are logged regardless of their size, and the resulting logs can used in restoring the repository from a GemStone backup.
- Partial logging is intended for use during evaluation or early stages of application development. Partial logging allows a simple operation to run unattended for an extended period and permits automatic recovery from system crashes that do not corrupt the repository. Logs created in this mode cannot be used in restoring the repository from a backup.
In partial logging mode, frequent backups are recommended; any data that is not backed up may be lost if there are disk issues or the repository becomes corrupted.
Full logging is “sticky”; once a repository has started in full logging, changing the logging back to partial logging requires special steps. See To Change to Partial Logging. If you are in partial logging mode, to enable full transaction logging, simply change the configuration setting STN_TRAN_FULL_LOGGING to True and restart the Stone.
After changing from partial to full logging, make a backup as soon as possible. While you may have backups that were made in partial logging mode, these partial-logging-mode backups cannot be used to restore the full-logging-mode transaction logs.
For more information about the logging mode and the administrative differences, see Logging Modes.
Estimating Disk Space for Transaction Logs
How much disk space does your application need for transaction logs? The answer depends on several factors:
- The logging mode that you choose
- Characteristics of your transactions
- How often you archive and remove the logs
If GemStone is in full transaction logging mode (the default), you must allow sufficient space to log all transactions until you next archive the logs.
CAUTION
If the Stone exhausts the transaction log space, users will be unable to commit transactions until space is made available.
You can estimate the space required from your transaction rate and the number of bytes modified in a typical transaction. Example 2.1 provides an estimate for an application that expects to generate 4500 transactions a day.
GemStone is writing to exactly one log at any given time. The number of transaction logs that should be available for automatic recovery will include this log, of course, and zero or more previous logs. The number of previous logs that is needed depends on the time of the most recent checkpoint, and if there are any long-running transactions.
The method Repository>>oldestLogFileIdForRecovery identifies the oldest log file needed for recovery from the most recent checkpoint, if the Stone were to crash. These log files should be left in place to allow automatic recovery.
Log files older than this are needed only if it becomes necessary to restore the repository from a backup. These may be archived, but should be kept at least until the next backup is made.
Example 2.1 Space for Transaction Logs Under Full Logging
Average transaction rate = 5 per minute
Duration of transaction processing = 15 hours per day
Average transaction size = 5 KB
Archiving interval = Daily
Transactions between archives 5 per minute * 60 minutes * 15 hours = 4500
Log space (minimum) 4500 transactions * 5 KB = 22 MB
If GemStone is configured for partial logging, you need only provide enough space to maintain transaction logs since the last repository checkpoint. Ordinarily, two log files are sufficient: the current log and the immediately previous log. There is no need to retain logs; in partial logging mode, transaction logs are used only after an unexpected shutdown to recover transactions since the last checkpoint.
Choosing the Log Location and Size Limit
The considerations in choosing a location for transaction logs are similar to those for extents:
- Keep transaction logs on a different disk than operating system swap space.
- Where possible, keep the extents and transaction logs on separate disks—doing so reduces I/O contention while increasing fault tolerance.
- Because update-intensive applications primarily are writing to the transaction log, storing raw data in a disk partition (rather than in a file system) may yield better performance.
WARNING
Because the transaction logs are needed to recover from a system crash, do NOT place them in directories such as /tmp that are automatically cleared during power-up.
Transaction logs use sequential access exclusively, so the devices can be optimized for that access.
With raw partitions, or when in partial transaction logging mode, GemStone requires at least two log locations (directories or raw partitions) so it can switch to another when the current one is filled. In full transaction mode, logging to transaction logs on the file system, one directory may be used, in which case all transaction logs are created in that directory.
When you set the log locations in the configuration file, you should also check their size limit.
Although the size of 100 MB provided in the default configuration file is adequate in many situations, update-intensive applications should consider a larger size to limit the frequency with which logs are switched. Each switch causes a checkpoint to occur, which can impact performance.
NOTE
For best performance using raw partitions, the size setting should be slightly smaller than the size of the partition so GemStone can avoid having to handle system errors. For example, for a 2 GB partition, set it to 1998 MB.
The following example sets up a log in a 2 GB raw partition and a directory of 100 MB logs in the file system. This setup is a workable compromise when the number of raw partitions is limited. The file system logs give the administrator time to archive the primary log when it is full.
STN_TRAN_LOG_DIRECTORIES = /dev/rdsk/c4d0s2, /user3/tranlogs;
STN_TRAN_LOG_SIZES = 1998, 100;
How To Set Up a Raw Partition
WARNING
Using raw partitions requires extreme care. Overwriting the wrong partition destroys existing information, which in certain cases can make data on the entire disk inaccessible.
Raw partitions are system-dependent; you will need to work with your system administrator and consult your system documentation to setup or locate a partition of suitable size.
You can mix file system-based files and raw partitions in the same repository, and you can add a raw partition to existing extents or transaction log locations. The partition reference in /dev must be readable and writable by anyone using the repository, so you should give the entry in /dev the same protection as you would use for the corresponding type of file in the file system.
The first step is to find a partition (raw device) that is available for use. Depending on your operating system, a raw partition may have a name like /dev/rdsk/c1t3d0s5, /dev/rsd2e, or /dev/vg03/rlvol1. A partition is available if all of the following are true:
- It does not contain the root (/) file system (on some systems, the root volume group).
- It is not on a device that contains swap space.
- Either it does not contain a file system or that file system can be left unmounted and its contents can be overwritten.
- It is not already being used for raw data.
When you select a partition, make sure that any file system tables, such as /etc/vfstab, do not call for it to be mounted at system boot. Use chmod and chown to set read-write permissions and ownership of the special device file the same way you would protect a repository file in a file system. .
If the partition will contain the primary extent (the first or only one listed in DBF_EXTENT_NAMES), initialize it by using the GemStone copydbf utility to copy an existing repository extent to the device. The extent must not be in use when you copy it. If the partition already contains a GemStone file, first use removedbf to mark the partition as being empty.
Partitions for transaction logs do not need to be initialized, nor do secondary extents into which the repository will expand later.
Sample Setup for Extent on Raw Partition
The following example configures GemStone to use the raw partition /dev/rsd2d as the repository extent.
Step 1. If the raw partition already contains a GemStone file, mark it as being empty. (The copydbf utility will not overwrite an existing repository file.)
% removedbf /dev/rsd2d
Step 2. Use copydbf to install a fresh extent on the raw partition. (If you copy an existing repository, first stop any Stone that is running on it, or suspend checkpoints)
% copydbf $GEMSTONE/bin/extent0.dbf /dev/rsd2d
Step 3. As root, change the ownership and the permission of the partition special device file in /dev to what you ordinarily use for extents in a file system. For instance:
# chown gsAdmin /dev/rsd2d# chmod 600 /dev/rsd2d
You should also consider restricting the execute permission for $GEMSTONE/bin/removedbf and $GEMSTONE/bin/removeextent to further protect your repository. In particular, these executable files should not have the setuid (S) bit set.
Step 4. Edit the Stone’s configuration file to show where the extent is located:
DBF_EXTENT_NAMES = /dev/rsd2d;
Step 5. Use startstone to start the Stone repository monitor in the usual manner.
Changing Between Files and Raw Partitions
This section tells you how to change your configuration by moving existing repository extent files to raw partitions or by moving existing extents in raw partitions to files in a file system. You can make similar changes for transaction logs.
Moving an Extent to a Raw Partition
To move an extent from the file system to a raw partition, do this:
Step 1. Define the raw disk partition device. Its size should be at least 16 MB larger than the existing extent file.
Step 2. Stop the Stone repository monitor.
Step 3. Edit the repository’s configuration file, substituting the device name of the partition for the file name in DBF_EXTENT_NAMES.
Set DBF_EXTENT_SIZES for this extent to be 16 MB smaller than the size of the partition.
Step 4. Use copydbf to copy the extent file to the raw partition. (If the partition previously contained a GemStone file, first use removedbf to mark it as unused.)
Moving an Extent to the File System
The procedure to move an extent from a raw partition to the file system is similar:
Step 1. Stop the Stone repository monitor.
Step 2. Edit the repository’s configuration file, substituting the file pathname for the name of the partition in DBF_EXTENT_NAMES.
Step 3. Use copydbf to copy the extent to a file in a file system, then set the file permissions to the ones you ordinarily use.
Moving Transaction Logging to a Raw Partition
To switch from transaction logging in the file system to logging in a raw partition, do this:
Step 1. Define the raw disk partition. If you plan to copy the current transaction log to the partition, its size should be at least 1 to 2 MB larger than current log file.
Step 2. Stop the Stone repository monitor.
Step 3. Edit the repository’s configuration file, substituting the device name of the partition for the directory name in STN_TRAN_LOG_DIRECTORIES. Make sure that STN_TRAN_LOG_SIZES for this location is 1 to 2 MB smaller than the size of the partition.
Step 4. Use copydbf to copy the current transaction log file to the raw partition. (If the partition previously contained a GemStone file, first use removedbf to mark it as unused.)
You can determine the current log from the last message “Creating a new transaction log” in the Stone’s log. If you don’t copy the current transaction log, the Stone will open a new one with the next sequential fileId, but it may be opened in another location specified by STN_TRAN_LOG_DIRECTORIES.
Moving Transaction Logging to the File System
The procedure to move transaction logging from a raw partition to the file system is similar:
Step 1. Stop the Stone repository monitor.
Step 2. Edit the repository’s configuration file, substituting a directory pathname for the name of the partition in STN_TRAN_LOG_DIRECTORIES.
Step 3. Use copydbf to copy the current transaction log to a file in the specified directory. The copydbf utility will generate a file name like tranlognnn.dbf, where nnn is the internal fileId of that log.
Server Response to Gem Fatal Errors
The Stone repository monitor is configurable in its response to a fatal error detected by a Gem session process. If configured to do so, the Stone can halt and dump debug information if it receives notification from a Gem that the Gem process died with a fatal error. By stopping both the Gem and the Stone at this point, the possibility of repository corruption is minimized.
In the default mode, the Stone does not halt if a Gem encounters a fatal error. This is usually preferable for deployed production systems.
During application development, it may be helpful to know exactly what the Stone was doing when the Gem went down. It may in some cases be preferred to absolutely minimize the risk of repository corruption, at the risk of system outage. To configure the Stone to halt when a fatal gem error is encountered, change the following in the Stone’s configuration file:
2.3 How To Access the Server Configuration at Run Time
GemStone provides several methods in class System that let you examine, and in certain cases modify, the configuration parameters at run time from Smalltalk.
To Access Current Settings at Run Time
Class methods in System, in the in category Configuration File Access, let you examine the system’s Stone configuration. The following access methods all provide similar server information:
stoneConfigurationReport
Returns a SymbolDictionary whose keys are the names of configuration file parameters, and whose values are the current settings of those parameters in the repository monitor process.
configurationAt: aName
Returns the value of the specified configuration parameter, giving preference to the current session process if the parameter applies to a Gem.
stoneConfigurationAt: aName
Returns the value of the specified configuration parameter from the Stone process, or returns nil if that parameter is not applicable to a Stone.
(The corresponding methods for accessing a session configuration are described here.)
Here is a partial example of the Stone configuration report:
topaz 1> printit
System stoneConfigurationReport asReportString
%
#'StnEpochGcEnabled' false
#'StnCrBacklogThreshold' 80
#'STN_TRAN_LOG_SIZES' 100
#'StnTranLogDebugLevel' 0
...
Keys in mixed capitals and lowercase, such as StnEpochGcEnabled, are internal run-time parameters.
To Change Settings at Run Time
The class method System class>>configurationAt: aName put: aValue lets you change the value of the internal run-time parameters in Table 2.1, if you have the appropriate privileges.
In the reports described in the preceding section, parameters with names in all uppercase are read-only; for parameters that can be changed at runtime, the name is in mixed case.
CAUTION
Avoid changing configuration parameters unless there is a clear reason for doing so. Incorrect settings can have serious adverse effects on performance. For additional guidance about run-time changes to specific parameters, see Appendix A, “GemStone Configuration Options”.
The following example first obtains the value of #StnAdminGcSessionEnabled. This value can be changed at run time by a user with GarbageCollection privilege:
topaz 1> printit
System configurationAt: #StnAdminGcSessionEnabled
%
true
topaz 1> printit
System configurationAt: #StnAdminGcSessionEnabled put: false
%
false
For more information about these methods, see the comments in the image.
2.4 Tuning Server Performance
There are a number of configuration options by which you can tune the GemStone server. These options can help make better use of resources such as memory and I/O.
Tuning the Shared Page Cache
Two configuration options can help you tailor the shared page cache to the needs of your application: SHR_PAGE_CACHE_SIZE_KB and SHR_SPIN_LOCK_COUNT.
You may also want to consider object clustering within Smalltalk as a means of increasing cache efficiency.
Adjusting the Cache Size
As your repository or number of users grows, you may want to adjust the SHR_PAGE_CACHE_SIZE_KB configuration parameter setting.
You can use the statistics for a running application to monitor the load on the cache. In particular, the statistics FreeFrameCount and FramesFromFindFree may be useful, as well as FramesFromFreeList.
As described under Estimating the Size of the Shared Page Cache, increasing the size of the cache, up to the size that will hold the entire repository, will usually improve performance.
Matching Spin Lock Limit to Number of Processors
The setting for the SHR_SPIN_LOCK_COUNT configuration option specifies the number of times a process should attempt to obtain a lock in the shared page cache using the spin lock mechanism before resorting to setting a semaphore and sleeping. We recommend leaving SHR_SPIN_LOCK_COUNT set to –1 (the default), which causes GemStone to determine whether multiple processors are installed and set the parameter accordingly.
Controlling Checkpoint Frequency
On each commit, committed changes are immediately written to the transaction logs, but the writing of this data, recorded on "dirty pages," from the shared page cache to the extents may lag behind.
At a checkpoint, all remaining committed changes that have not yet been written to the extents are written out, and the repository updated to a new consistent committed state. If the volume of these waiting committed changes is high, there may be a performance hit as this data is written out. Between checkpoints, new committed changes written to the extents are not yet considered part of the repository's consistent committed state until the next checkpoint.
If checkpoints interferes with other GemStone activity, you may want to adjust their frequency.
- In full transaction logging mode, most checkpoints are determined by the STN_CHECKPOINT_INTERVAL configuration option, which by default is five minutes. A few Smalltalk methods, such as Repository>>fullBackupTo:, force a checkpoint at the time they are invoked. A checkpoint also is performed each time the Stone begins a new transaction log.
- In partial logging mode, checkpoints also are triggered by any transaction that is larger than STN_TRAN_LOG_LIMIT, which sets the size of the largest entry that is to be appended to the transaction log. The default limit is 1 MB of log space. If checkpoints are too frequent in partial logging mode, it may help to raise this limit. Conversely, during bulk loading of data with large transactions, it may be desirable to lower this limit to avoid creating large log files.
A checkpoint also occurs each time the Stone repository monitor is shut down gracefully, as by invoking stopstone or System class>>shutDown. This checkpoint permits the Stone to restart without having to recover from transaction logs. It also permits extent files to be copied in a consistent state.
While less frequent checkpoints may improve performance in some cases, they may extend the time required to recover after an unexpected shutdown. In addition, since checkpoints are important in the recycling of repository space, less frequent checkpoints can mean more demand on free space (extent space) in the repository.
Tuning Page Server Behavior
GemStone uses page servers for three purposes:
- To write dirty pages to disk.
- To add free frames to the free frame list, from which a Gem can take as needed.
- To transfer pages from the Stone host to the shared page cache host, if different.
The AIO page server is a type of page server that performs all three functions. The AIO page server is running at all times, and is required in order to write updated data (dirty pages) to disk. The default configuration starts only one thread within the AIO page server. Larger applications with multiple extents will want to configure a larger number of threads to avoid a performance bottleneck.
The AIO page server runs only on the Stone’s node. By default on the Stone’s node, and on all remote nodes, there is a free frame page server. The Free frame page server is dedicated only to the third task listed above: adding free frames to the free list.
The number of free frame page server threads defaults to the same number as the number of AIO page server threads, and should not be set to a value lower than that.
Remote cache page servers and remote Gem page servers handle the tasks of handling pages between the Stone’s node and the remote shared page cache. These page servers will be described in Chapter 5, “Connecting Distributed Systems”.
To Add AIO Page Server threads
By default the Stone starts the AIO page server process with a single thread, to perform asynchronous I/O (AIO) between the shared page cache and the extents. This process updates extents during a checkpoint.
If your configuration has multiple extents on separate disk spindles, you should generally increase the number of threads in the AIO page server. You can do this by changing the STN_NUM_LOCAL_AIO_SERVERS configuration option.
For multiple page server threads to improve performance, they must be able to execute at the same time and write to disk at the same time. If you have only one CPU, or your extents are on a single disk spindle, multiple AIO page server threads will not be able to write pages out faster than a single thread.
Free Frame Page Server
A Gem can get free frames either from the free list (the quick way), or, if sufficient free frames have not been added to the list, by scanning the shared page cache for a free frame instead. What constitutes sufficient free frames is determined by the GEM_FREE_FRAME_LIMIT configuration option).
To assist the AIO page server in adding frames back to the free list, the stone spawns a free frame page server, with the same number of threads as the AIO page server. The number of free frame page server threads should not be less than the number of AIO page server threads, to ensure the distribution of free pages and used pages remains balanced over the repository extents.
In some cases, increasing the number of free frame page servers can improve overall system performance. For example, if Gems are performing many operations requiring writing pages to disk, the AIO page server may have to spend all its time writing pages, never getting a chance to add free frames to the free list. Alternatively, if Gems are performing operations that require only reading, the AIO page server will see no dirty frames in the cache—the signal that prompts it to take action. In that case, it may sleep for a second, even though free frames are present in the cache and need to be added to the free list.
Process Free Frame Caches
There is a communication overhead involved in getting free frames from the free frame list for scanning. To optimize this, you can configure the Gems and their remote page servers to add or remove multiple free frames from a free frame cache to the free frame list in a single operation.
When using the free frame cache, the Gem or remote page server removes enough frames from the free list to refill the cache in a single operation. When adding frames to the free list, the process does not add them until the cache is full.
You can control the size of the Gem and remote page server free frame caches by setting the configuration parameters GEM_FREE_FRAME_CACHE_SIZE and GEM_PGSVR_FREE_FRAME_CACHE_SIZE, respectively.
The default behavior depends on the size of the shared page cache; if the shared page cache is 100MB or larger, a page server free frame cache size of 10 is used, so ten free frames are acquired in one operation when the cache is empty. For shared page cache sizes less than 100MB, the Gem or remote page server acquires the frames one at a time.
Running Cache Warming
When the repository is first started up, neither the object table nor any of the objects in the extents are loaded into memory. Initial accesses require reading a number of pages from disk containing the object table, and then reading the data pages that contain the objects.
This cost in a freshly restarted repository can be avoided by warming the cache—loading the object table, and optionally data pages containing the objects, into the cache. This allows the cost of loading pages into the cache to be done at startup time, rather than in the course of end-user application queries.
Cache warming is done using the startcachewarmer utility. This utility can be run manually, but since it is most useful immediately after startup, you normally configure your system to run this automatically as part of startup. Cache warming may take some minutes to complete, depending on the number of pages and disk performance; you can execute startstone and waitstone with arguments so they wait for cache warming to complete.
Configure what is loaded into the cache
The decision on what to load into the cache depends on the size of your shared page cache, relative to the size of your repository.
- If your shared page cache is very large and sufficiently large to hold all objects in the entire repository, you may wish to load all data pages into the cache. This is done using the -d argument.
- If your shared page cache is small relative to the repository size, and if the set of data pages that are used is highly variable, you may wish to load only the object table into the shared cache, and allow data pages to be loaded as needed. Ensure that the working set file /opt/gemstone/locks/<stoneName><hostid>workingSet.lz4 does not exist, and do not use either the -d or -D argument.
- When the entire repository does not fit into the cache, and there is a subset of data that is frequently used, and will predictably be needed after a Stone restart, you can configure the shared page cache monitor to write out a compressed set of pageIds of data pages that are in the cache. The cache warmer looks for this file and automatically loads these data pages. When the -w option was specified on cache warming before the previous Stone shutdown, the pages in the shared page cache after restart match what was in the cache on Stone shutdown.
The -w <interval> enables writing the working set file to disk, at the specified interval, to the file
/opt/gemstone/locks/<stoneName><hostid>workingSet.lz4
When the working set file exists, it is automatically used to load pages. Only pages that are valid are loaded, so there is no requirement to keep the file strictly in sync with the repository.
The full set of options for cache warming are described under startcachewarmer.
Configure when warming is run
To perform cache warming automatically every time the repository starts up, use the configuration parameters:
- STN_CACHE_WARMER_ARGS to warm the Stone’s shared page cache
- GEM_CACHE_WARMER_ARGS and GEM_CACHE_WARMER_MID_CACHE_ARGS to warm shared page caches that are started by Gems.
These parameters take a string containing the specific arguments to the startcachewarmer utility. Not all arguments make sense in the context of the configuration parameter; for example, you never need to provide the stone name or configuration file paths.
For example, to configure cache warming to write the working set out once a day and on stone shutdown, and to use four sessions to perform the warming, use the following:
STN_CACHE_WARMER_ARGS = "-w 1440 -n 4" ;
You may manually execute the startcachewarmer utility on the command line at any time, but it is most useful immediately after startup of the page cache to be warmed. Cache warming will only load pages until the cache is full.